To renovate a patio, you start by assessing what's actually wrong (surface wear vs. base failure), decide whether a surface refresh or full teardown makes sense, pull up the old material, fix the base and drainage, then relay your chosen surface and lock it in. Most homeowners can handle a full paver or gravel patio renovation in a weekend or two with rented equipment. The key is not skipping the base work, that's what makes the difference between a patio that lasts 20 years and one that starts sinking again by next spring.
How to Renovate a Patio: DIY Steps, Materials, and Costs

Nolan Lennox
19 Jun 2026
Start here: assessing your patio before you touch anything
Before you buy a single paver or rent a plate compactor, walk your patio slowly and look for the right things. A lot of renovation mistakes come from misreading symptoms. Cosmetic problems (faded color, surface staining, light cracking) and structural problems (sinking, heaving, drainage failure) look similar at first glance but need very different fixes.
Here's what to look for and what each symptom tells you:
| What you see | What it likely means | Urgency |
|---|---|---|
| Hairline surface cracks under 1/8" wide, no displacement | Surface wear, not structural failure | Low — refresh or seal |
| Cracked concrete with chunks missing or edges displaced | Structural deterioration — slab is failing | High — full replacement likely needed |
| Pavers rocking, uneven, or tilted | Weak or improperly prepared base, washed-out sand | Medium — reset or full base repair |
| Standing water pooling on the surface | Wrong pitch/grade or failed drainage below the surface | High — base and drainage work required |
| White chalky residue on pavers or concrete (efflorescence) | Water moving salts through the material — moisture problem below | Medium — fix the moisture source first |
| Weeds growing through joints | Joint sand has washed out, likely from drainage or grade issues | Medium — rejoint after fixing grade |
| Wood deck boards soft, spongy, or crumbling | Fungal rot — check joists and ledger before resurfacing anything | High — structural check required |
| Gravel patio washed out or compacted thin | Base migration or inadequate original depth | Low-Medium — top up and re-compact |
Standing water is the one you absolutely cannot ignore. Water problems almost always originate below the surface, a bad grade, a collapsed base layer, or a drainage pipe that's blocked or absent. If you resurface over a wet base, you're just delaying the same failure by a couple of years. Fix the water first, always.
For wood patios and decks, probe soft-looking boards with a screwdriver. If it sinks in with light pressure, you have rot. Pull a couple of boards and look at the joists underneath. Minor, localized rot can sometimes be addressed by sistering (bolting a new joist alongside the rotted one), but significant structural rot means replacing the affected members outright, no wood filler or patch product restores structural strength to a rotted joist.
Surface refresh vs. full rebuild: how to choose
This is the most important decision in the whole project. Get it wrong and you'll be doing this again in two or three years. If your symptoms point to deeper failure or you want a fresh start, use this guide for how to replace a patio as your comparison point.
A surface refresh works when your base is still solid and your drainage is functioning. Think: faded pavers that just need new polymeric sand and a clean, resealed surface, or a concrete slab with only hairline cracks you want to resurface with a new overlay. Refreshes are faster, cheaper, and well within beginner DIY territory.
A full rebuild is the right call when the base has failed, when water is pooling or draining toward the house, when pavers are sinking and rocking across a wide area (not just one or two), or when concrete shows deep displacement, spalling, or progressive cracking. If the problems are spreading or recurring, you're not going to patch your way out of it.
- Choose a surface refresh if: cracks are hairline and non-displaced, pavers are just faded or have loose joint sand in isolated spots, the slab is structurally sound but cosmetically tired, or drainage flows correctly and there's no pooling.
- Choose a full rebuild if: pavers are sinking across multiple areas, water pools on the surface or against the house, the base shifts or feels hollow underfoot, concrete shows deep displacement or heaving, or wood framing has significant structural rot.
- Consider a partial rebuild if: problems are isolated to one zone — you can excavate and rebase just that section without tearing out everything.
If you're on the fence, dig a small test hole at the edge of a problem area and look at your base. A good base has compacted gravel at least 4 to 6 inches deep (more in cold climates). If you find soft soil, thin gravel, or no gravel at all, that's your answer. Full rebuild.
Picking your renovation material

Your material choice affects cost, how long the project takes, how hard it is to DIY, and what maintenance looks like for the next decade. Here's how the main options stack up:
| Material | DIY difficulty | Approx. material cost (per sq ft) | Durability | Maintenance |
|---|---|---|---|---|
| Concrete pavers / brick | Moderate | $3–$8 | Very high (20–30+ years with good base) | Re-sand joints every few years, occasional sealing |
| Natural stone pavers | Moderate–Hard | $8–$20+ | Excellent | Periodic sealing, weed control |
| Poured concrete (resurfaced) | Moderate (overlay) / Hard (full pour) | $2–$6 (overlay) | High if base is solid | Seal every 2–3 years, patch cracks as they appear |
| Gravel / decomposed granite | Easy | $1–$3 | Moderate (needs periodic top-up) | Rake, top up gravel annually, edge maintenance |
| Pressure-treated wood decking | Moderate | $3–$7 | Good (10–15 years) | Stain/seal every 2–3 years, inspect for rot annually |
| Composite decking | Moderate | $7–$15 | Excellent (25+ years) | Very low — clean twice a year, no staining needed |
Concrete pavers and brick
This is the most forgiving DIY renovation material. Individual pavers can be pulled up and reset if one section settles again, which you absolutely cannot do with poured concrete. They're also easier to cut to fit (though you'll need a wet saw, more on that in the tools section). For most homeowners renovating an existing patio, concrete pavers are the first recommendation.
Gravel
Gravel is the lowest-cost, fastest renovation option and the most beginner-friendly. If you want a targeted upgrade, this section also helps you decide how to revamp patio with the right surface refresh versus a full rebuild Gravel is the lowest-cost, fastest renovation option. It drains naturally, so drainage problems are less catastrophic, and you can top up gravel yourself in an afternoon. The tradeoff is that it needs more ongoing maintenance and doesn't give you the clean, finished look of pavers. It's a great choice for casual or informal outdoor spaces, or if budget is tight right now.
Wood and composite
If you're renovating a raised or ground-level wood patio, you're looking at replacing decking boards and potentially some structural members. Pressure-treated wood costs less upfront but needs regular maintenance. Composite costs more to buy but holds up better over time with minimal upkeep, no staining, no splinters, no annual sealing. If the framing is solid and you're just replacing the surface boards, composite is worth the price bump for most people.
Tools, prep work, and teardown
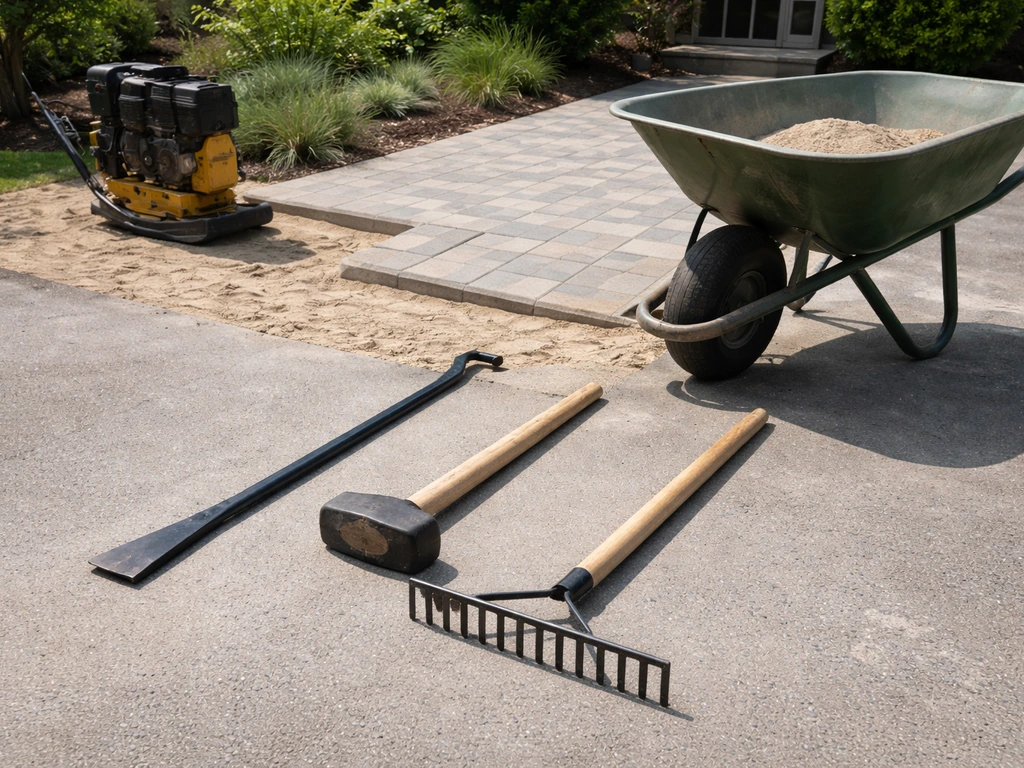
Tools you'll need
- Pry bar and hand maul (for lifting pavers or old edging)
- Plate compactor — rent one rated around 5,000 lbf (22 kN), operating at 75–90 Hz for paver work; most equipment rental shops carry these for $60–$100/day
- Screed rails and screed board (for leveling bedding sand)
- Long level or laser level (for checking slope and grade)
- Rubber mallet
- Wet saw or angle grinder with diamond blade for cutting pavers or brick
- Landscape fabric (if resetting over a new gravel base)
- Wheelbarrow and round-point shovel
- Tamper (hand version, for tight spots the plate compactor can't reach)
- Safety gear: dust mask rated N95 or better, safety glasses, knee pads, gloves
A note on cutting masonry: cutting pavers, brick, or concrete blocks with a dry grinder kicks up respirable crystalline silica dust at levels that can cause serious lung damage. Always use a wet saw when cutting, which suppresses dust at the source. If you have to use a dry method, wear a properly fitted respirator (not just a dust mask) and work outdoors with airflow at your back. This isn't optional safety theater, it's a real hazard.
Teardown and prep
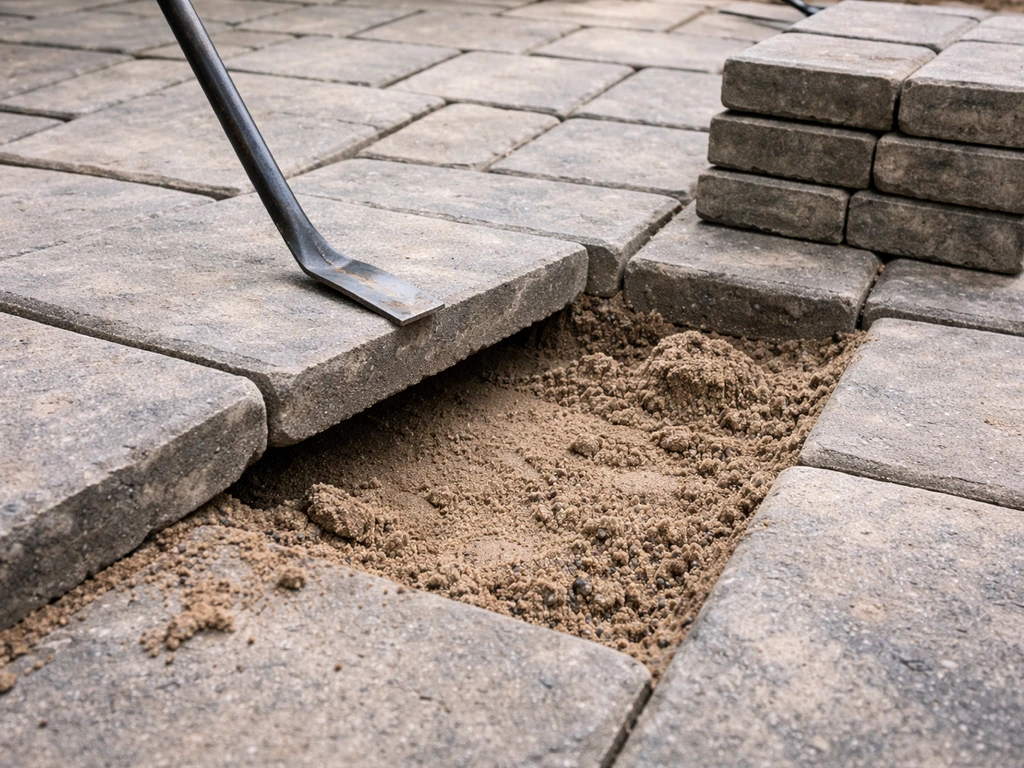
If you're doing a surface refresh of loose pavers, you can often lift them with a pry bar, set them aside, and relay them on fresh bedding sand. Stack them carefully as you go so you can relay them in the same pattern. If you're doing a full rebuild, you're excavating down to subgrade.
For a concrete slab teardown, rent a jackhammer or electric demolition hammer. Break it into manageable chunks (roughly 12x12 inches) and remove. Concrete disposal is the part people underestimate, you'll need a rented dumpster or multiple trailer hauls. Budget for this.
Grading, drainage, and base
Once the old material is out, check your grade. If you want to know how to update patio surfaces without starting from scratch, focus first on drainage and the base, then choose the right refresh approach for your material. Your patio surface should slope away from the house at a minimum of 1% (about 1/8 inch per foot) and ideally closer to 2% (1/4 inch per foot).
Use a long level and tape measure to confirm this before you compact anything. If you have a chronic water problem, a French drain installed around the perimeter can collect and transport water away, trench it with landscape fabric lining, fill with gravel around a perforated pipe, and make sure the pipe runs to a proper outlet with at least 0. 5% slope (1% is better to prevent sediment buildup).
For a paver or hard-surface patio, your base depth should be 4 to 6 inches of compacted gravel in normal conditions, and 6 to 8 inches in freeze-thaw climates. Compact in 2-inch lifts, don't dump 6 inches in and compact it once. Use a plate compactor for compacting during paver installation, and follow the guide’s base depth guidance based on your soil conditions so the base is compacted adequately plate compactor and base depth guidance based on soil conditions. Each lift needs its own pass with the plate compactor. This is the step most DIYers rush, and it's exactly what causes settling later.
Step-by-step renovation process
These steps cover a full paver patio renovation, which involves the most complete workflow. If you're doing a gravel refresh or wood deck resurfacing, you'll skip some steps, but the planning and base principles still apply.
- Mark out your patio perimeter and confirm dimensions. Stake string lines to define edges and check for square using the 3-4-5 triangle method.
- Remove existing surface material. Lift old pavers with a pry bar and stack them. Break up and remove old concrete with a demolition hammer. Clear all debris.
- Excavate to the correct depth. Dig down to accommodate your base depth (4–8 inches of gravel) plus 1 inch of bedding sand plus paver thickness. Typically 8–12 inches total below finished grade.
- Check and correct grade on the subgrade. Use a level and stakes to ensure the subgrade slopes away from your house at 1–2%. Adjust by cutting high spots or filling low ones, then compact the subgrade with one pass of the plate compactor.
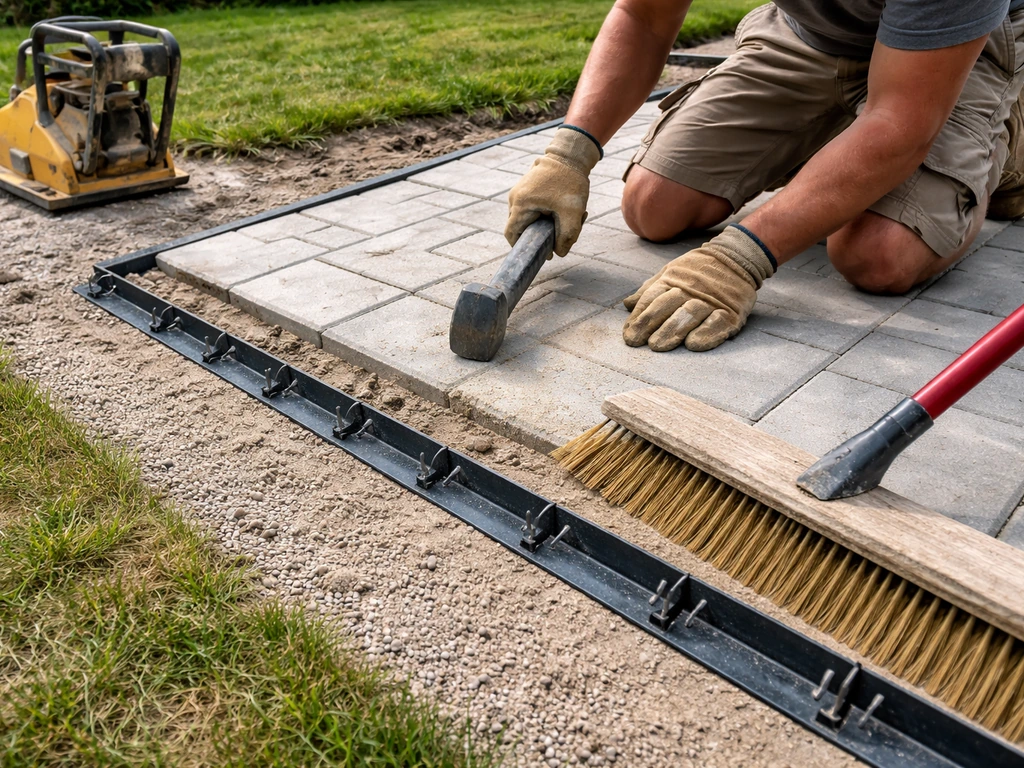
- Install edge restraints. Set plastic or metal edging along your perimeter and spike it into the ground. This keeps everything contained during the rest of the build.
- Install optional landscape fabric on the subgrade. This suppresses weed growth and prevents base material from migrating into softer soil below.
- Add and compact gravel base in 2-inch lifts. Pour crushed gravel (3/4-inch clean stone or road base), spread it 2 inches deep, compact thoroughly, and repeat until you reach your target base depth.
- Screed the bedding sand. Add about 1 inch of coarse bedding sand (not fine play sand) and use screed rails to pull it flat and level. Do not compact the sand after screeding — you'll disturb the level surface.
- Lay pavers. Start from a fixed straight edge and work outward. Set each paver gently without sliding it across the sand. Check level frequently with a hand level. Save cut pieces for the edges.
- Cut edge pieces with a wet saw. Measure carefully and cut to fit the perimeter gaps.
- Compact the finished paver surface. Run the plate compactor over the entire finished surface — this seats the pavers into the bedding sand. Expect about 3/16-inch settlement. If you have a poly paver protector pad, use it to prevent surface scuffing.
- Sweep in polymeric sand. Pour polymeric sand over the surface and sweep it into all joints. Compact again lightly, then sweep in a second round. Blow off excess from paver faces and activate the sand with a gentle mist of water per the product instructions.
- Allow to cure. Keep foot traffic off for at least 24 hours while the polymeric sand sets.
For wood and composite deck resurfacing
If the framing is sound, you remove the old decking boards, inspect every joist for rot (probe with a screwdriver), sister or replace any compromised members, and then install joist tape or flashing tape along the top of each joist before laying new boards. That tape layer creates a waterproof barrier that sheds moisture away from wood-to-wood contact points, it's the single best way to prevent the rot cycle from repeating. Then install new decking boards with appropriate fasteners, cut to length, and finish with any trim or fascia you're updating.
Budgeting, timelines, and planning for your skill level
Realistic cost ranges
| Renovation type | DIY material + rental cost (200 sq ft) | Professional cost (200 sq ft) | Timeline (DIY) |
|---|---|---|---|
| Paver surface refresh (re-sand, clean, seal) | $100–$300 | $500–$1,000 | 1 day |
| Full paver rebuild (excavate, new base, new pavers) | $1,500–$3,500 | $4,000–$8,000 | 2–3 weekends |
| Gravel patio renovation | $300–$700 | $800–$1,500 | 1 weekend |
| Concrete overlay/resurfacing | $400–$900 | $1,500–$3,000 | 1–2 days |
| Wood deck resurfacing (boards only) | $800–$2,000 | $2,500–$5,000 | 1–2 weekends |
| Composite deck resurfacing (boards only) | $1,800–$4,000 | $4,000–$8,000 | 1–2 weekends |
Equipment rental adds up fast if you're not organized. Reserve the plate compactor and any demo equipment for back-to-back days so you're not paying for idle rental time. Most home improvement stores and local equipment rental shops charge $60–$120/day for a plate compactor and $80–$150/day for a demolition hammer.
Matching the project to your skill level
Be honest with yourself here. A gravel refresh or a paver re-sand-and-seal is a genuine beginner project. A full paver teardown and rebuild is intermediate, it's manageable but you need to be comfortable with grading work and running a plate compactor. Concrete demolition and disposal is physically demanding and requires planning for debris removal. Wood framing structural repairs should involve someone with carpentry experience if you're not confident assessing rot damage.
- Beginner-friendly: gravel renovation, paver re-sanding, cleaning and sealing existing surfaces, replacing individual loose or rocking pavers
- Intermediate DIY: full paver base rebuild, composite board replacement on an existing solid frame, installing a French drain
- Consider getting help: concrete slab demolition and disposal (especially large areas), structural wood framing repairs, projects requiring grading equipment beyond a hand level
If your budget is tight, a phased approach works well. Fix the base and drainage this season, then resurface next season once you've saved for materials. For a clear, practical approach to how to transform a patio, start by fixing the base and drainage before you resurface. A solid, level base with temporary gravel is far better than a pretty surface over a failing foundation.
Finishing touches, maintenance, and keeping it looking good
The finishing details that matter
Edge restraints, proper joint fill, and a final compaction pass are what separate patios that stay put from ones that spread and shift over time. Don't skip the final plate compactor pass after setting pavers, it seats everything into the sand and ensures the surface is unified, not just sitting on top of it. If you're using polymeric sand, follow the activation instructions precisely. Under-watering it leaves joints dusty and soft; over-watering washes it out.
For wood or composite surfaces, install any trim, fascia boards, and stair nosing before calling the job done. These finishing pieces protect exposed edges and make the whole project look intentional rather than improvised.
Ongoing maintenance by material
- Pavers and brick: Inspect joints annually — if you see weeds pushing through or sand washing out, it's time to re-sand. Seal the surface every 2–3 years to protect color and reduce weed/moss growth. If you see efflorescence (white chalky deposits), clean it with an efflorescence remover, but also investigate where moisture is entering — cleaning the surface without fixing the moisture source will just bring it back.
- Gravel: Top up with fresh gravel as needed (usually every 1–2 years). Rake smooth after heavy rain events. Check edging annually and re-spike if it's pulling loose.
- Concrete (sealed or overlaid): Reapply concrete sealer every 2–3 years. Fill small cracks promptly before water gets in and expands them through freeze-thaw cycles.
- Wood decking: Inspect for soft spots, rot, and loose fasteners every spring. Clean with a deck wash, let dry thoroughly, and apply stain/sealer every 2–3 years.
- Composite decking: Sweep regularly and wash twice a year with soap and water. Check for mold or mildew in shaded areas and treat with a composite-safe cleaner. No staining or sealing required.
Safety during the renovation
A few safety points worth repeating: Always use a wet saw when cutting pavers, brick, or concrete. Dry cutting generates silica dust at levels that can cause serious long-term lung disease, and even one heavy exposure session matters. If you must cut dry, use a properly fitted respirator rated for silica dust, an N95 as a minimum. Wear safety glasses throughout demolition and cutting, and gloves when handling pavers and edging (the edges are sharp). Keep kids and pets away from the work area during demolition and compaction.
For any patio that's attached to the house, confirm you know where underground utilities run before you dig. Most areas have a free call-before-you-dig service (811 in the US) that marks utility lines within a few days. This step takes five minutes and prevents a very bad day.
Once the renovation is done and the polymeric sand has cured (or the composite boards are fastened down), step back and actually enjoy it for a minute before moving on to the next project. A well-renovated patio done right should last 15 to 30 years with basic maintenance, and you'll have learned exactly how it was built, which makes every future repair straightforward.
FAQ
How do I tell if I should resurface or do a full patio rebuild when the damage looks patchy?
Do a test hole at the edge and also at the center of the worst area. If the base is thin or soft in multiple spots, it usually means the failure is spreading, and a surface-only fix will not hold. If only the top sand or a localized settlement pocket is failing, you can often reset that section after correcting drainage.
Can I renovate a patio that already has pavers but the slope still seems flat?
Yes, but you typically cannot fix slope by just adding a few inches of bedding sand. You need to regrade the base so the entire patio falls away from the house (minimum 1% and ideally 2%). Plan for some pavers to be lifted and reset, and expect to rebuild restraints if the height change is significant.
What happens if I use polymeric sand but don’t compact the pavers before it’s installed?
Polymeric sand can help lock joints, but it cannot replace proper bedding and compaction. If the base is not seated, pavers can still rock or sink, and the joint material can fail prematurely because the system keeps moving. After setting, do the final plate compactor pass, then mist polymeric sand exactly per the manufacturer’s activation instructions.
How long should I wait before using the patio after a renovation?
With paver joints, avoid heavy traffic until the polymeric sand has fully activated and cured according to the instructions, short-term use is fine but don’t drag furniture across fresh joints. For concrete overlays or resealed surfaces, follow the cure window in the product datasheet, because “walk-on” time is not always the same as “move heavy items” time.
Is it okay to top up gravel over an existing gravel patio instead of excavating?
Sometimes, but only if the existing layer is still well-compacted and has the correct slope. If water is pooling or you see potholes forming, add-on gravel usually traps and covers a failing base. In that case, excavate to subgrade, correct grade, add fresh base in lifts, then re-top with the chosen gravel.
What’s the fastest way to reduce standing water without doing a full teardown?
Start by fixing grading and drainage first. If standing water is localized, you may be able to adjust the surface and bedding after identifying where runoff is coming from. If water is pooling because of base collapse or a blocked drainage line, you will need to open the area, correct the under-base drainage path, and only then re-lay the surface.
Do I need edge restraints, and what goes wrong if I skip them?
Edge restraints prevent pavers or gravel from creeping outward as joints relax and loads shift. Without restraints, you often see spreading, uneven seams, and eventually a loss of slope, which brings back pooling and settlement. If you renovate, treat restraints as part of the system, not an optional upgrade.
How can I avoid damage when cutting pavers, especially if I only need a few cuts?
Measure twice and dry-fit before cutting. Rent or use a wet saw for any masonry cuts to reduce silica dust, and keep a shop-vac nearby for slurry cleanup. Cut slowly, use the right blade for the material, and plan your pattern so cut edges land where they are less visible, typically near borders or against walls.
What should I do if I find rot on a wood patio deck but the rest of the framing looks solid?
Probe all joists, not just the boards that look worst. If rot is limited and the surrounding framing is solid, sistering can work, but you must remove all compromised wood first and use proper fasteners. After repairs, install moisture-shedding flashing or joist tape and ensure the deck has airflow and drainage so the rot cycle does not return.
How do I budget for debris and disposal during concrete patio demolition?
Plan for concrete disposal separately from equipment rental. Break the slab into manageable chunks and consider a rented dumpster if you have enough volume, or schedule multiple trailer hauls. If you underestimate disposal, the project stalls because you cannot legally dump in most areas, and hauling delays can cost extra time and rental days.
Can I renovate without renting a plate compactor?
For paver patios, you can do small resets, but for a proper base rebuild compaction is essential. Skipping or substituting light tools often leads to uneven settling. If you truly cannot rent one, the project may be better as a partial repair instead of a rebuild, or you can borrow equipment from a neighbor or hire a small base-compaction service.
Next Article
How to Replace a Patio: DIY Step-by-Step Guide
DIY guide to replace a patio end to end, from tear out and drainage to base prep, pavers or concrete, and finishing tips
