Replacing a patio means tearing out the old surface down to bare soil, rebuilding the base layer by layer, and installing a new surface that drains correctly and stays stable for years. It's more work than a quick resurface or patch, but if your current patio is heaving, pooling water, or crumbling from a failing base, it's the only fix that actually lasts.
How to Replace a Patio: DIY Step-by-Step Guide

Nolan Lennox
10 Jun 2026

A concrete overlay or resurfacing product can work fine if your slab is structurally sound, the base underneath is stable, and the damage is mostly cosmetic, surface spalling, staining, or minor cracking that hasn't moved resurface or patch.
A full replacement on a standard 12x16-foot patio typically takes a weekend for demo and base prep, another day or two for surface installation, and runs anywhere from a few hundred dollars (gravel) to several thousand (concrete or pavers), depending on materials and how much you DIY.
If you want to know how to revamp patio areas without a full replacement, start by comparing resurfacing options to a true tear-out based on your base and drainage conditions resurface or patch.
What patio replacement actually means for your situation
Not every problem requires a full tear-out. A concrete overlay or resurfacing product can work fine if your slab is structurally sound, the base underneath is stable, and the damage is mostly cosmetic, surface spalling, staining, or minor cracking that hasn't moved.
If cracking is mainly superficial, a concrete overlay is typically suitable, but if the slab has moved or there are signs of settling, heaving, or structural displacement, replacement is generally recommended because overlays follow the slab’s existing geometry a concrete overlay is generally suitable when damage is mostly surface-level cracking.
But if your slab has sections that feel hollow when you tap them, chunks that shift underfoot, widespread heaving from freeze-thaw cycles, or standing water that refuses to drain after rain, you're dealing with a base failure or drainage problem that no overlay can fix. Resurfacing a slab with drainage issues just recreates the same problem on a slightly newer surface.
Full replacement is the right call when you see any of these: settling that's dropped one section noticeably below another, cracks that are wide and uneven (not just hairline surface cracks), root damage that's lifted sections, or persistent pooling near your foundation. It's also worth doing a full replacement any time you want to change the shape, size, or material of your patio, since partial overlays don't let you do that cleanly.
If your situation is more cosmetic, topics like how to redo a patio or how to resurface and revamp an existing patio might be a better starting point. But if you're here because the whole thing needs to go, keep reading. If you already know the patio needs to be replaced, focus on rebuilding the base correctly and installing a surface that drains well so it lasts how to rebuild a patio.
Planning: measure twice, get the slope right
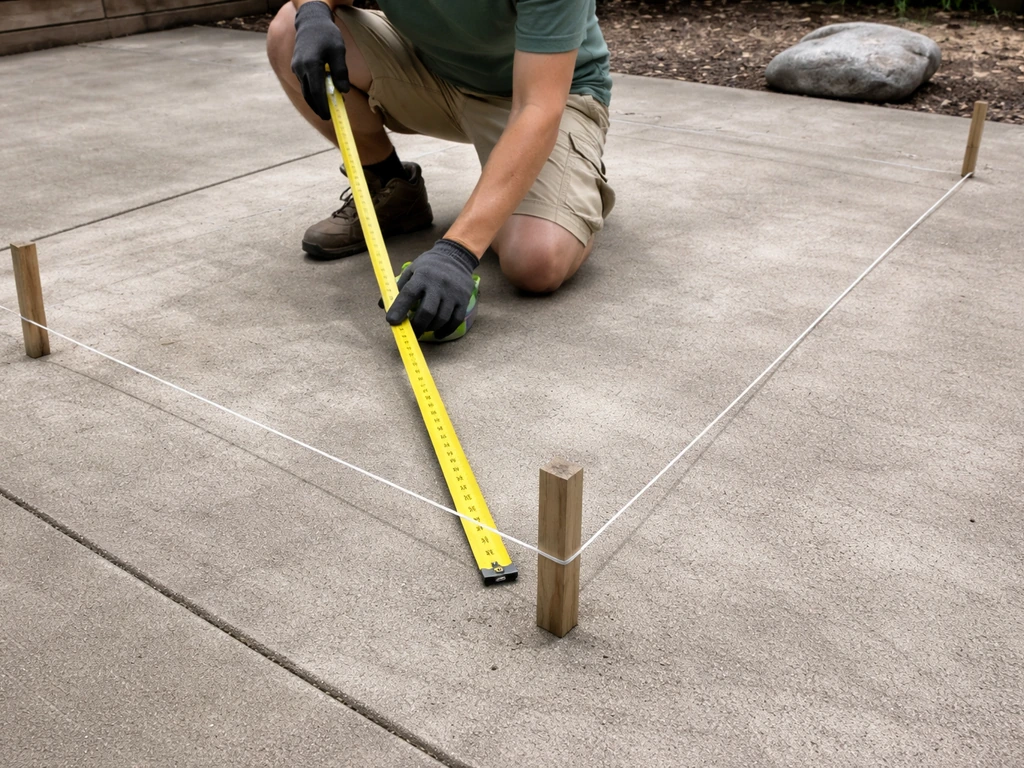
Before you order a single bag of gravel, spend an hour on planning. Measure the full footprint you want: length times width gives you square footage, which drives every material estimate. Sketch it out on paper, mark where the house foundation is, and note any existing landscaping, downspouts, or utility covers nearby. Also decide now if you want to expand or change the shape, because once demo starts, it's easy to reconfigure.
Drainage slope is the most important measurement most DIYers skip. Your finished patio surface needs to slope away from the house at a minimum of 1/8 inch per foot (about 1% grade) and ideally 1/4 inch per foot (2% grade). On a 12-foot-deep patio, that's 1.5 to 3 inches of drop from the house wall to the outer edge. Too little slope and water sits on the surface and eventually migrates toward your foundation. Too much slope and the patio feels tilted and uncomfortable to use. Use a long level and a tape measure to check your existing grade, and plan your base construction to hit that target slope in the finished surface.
Also check your soil type now. Clay soil drains poorly and shifts with moisture changes, which is exactly why many old patios fail. Sandy or gravelly soil drains well and compacts predictably. If you're working with clay, plan for a thicker base and consider adding drainage improvements like a gravel border trench around the perimeter before you build.
Demo and site prep: tear it out safely and dispose of it right
Call 811 before you dig anything

This is non-negotiable. Federal law requires you to contact your state's one-call notification system before breaking ground, and 811 is the national number that connects you to your local center. Call at least three business days before you want to start digging. A utility locator will come out and mark gas lines, electrical, water, and cable on your property for free. Cutting through a buried line is dangerous, expensive, and entirely avoidable.
Tools you'll need for demo
- Rotary hammer with chisel bit (or electric demolition hammer for concrete slabs)
- Pry bar and long-handled floor scraper
- Flat shovel and round-point shovel
- Wheelbarrow (at least one, ideally two if you have a helper)
- Work gloves, safety glasses, and dust mask or N95 respirator
- Plate compactor (rent one—it's worth it)
- Long level (4-foot minimum) and string lines with stakes
- Tape measure and marking paint or chalk line
The tear-out process
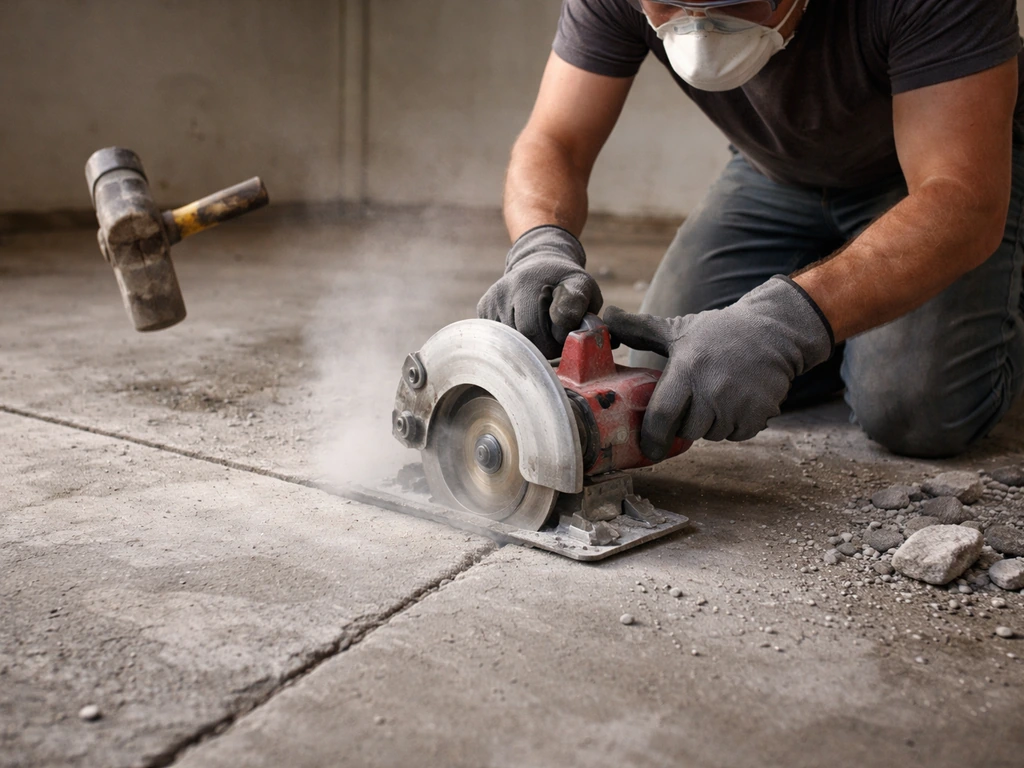
For a concrete slab, score cut lines with a circular saw and diamond blade (wear a mask, this creates a lot of silica dust), then use the demo hammer to break it into manageable chunks. Concrete is heavy; keep pieces small enough to actually lift. For brick or paver patios, pull the surface pieces by hand or with a pry bar, stack them on pallets if you're reusing them, and haul everything else out. For a wood or composite deck-style patio, use a reciprocating saw and impact driver to disassemble, and separate wood waste from hardware for easier disposal.
Concrete debris goes to a concrete recycling facility or a dumpster rated for heavy materials, most standard residential dumpsters have weight limits, so call before you rent. Many areas have concrete recyclers who'll take it for free or low cost. For a typical patio slab, expect 1 to 2 tons of debris per 100 square feet of 4-inch-thick concrete. Budget for a half-day to a full day of demo on an average patio, longer if you're working alone.
Building the base: the part that actually makes or breaks the project
This is where most DIY patios succeed or fail. A weak base is the reason the old patio failed in the first place. Don't rush it.
Excavation depth
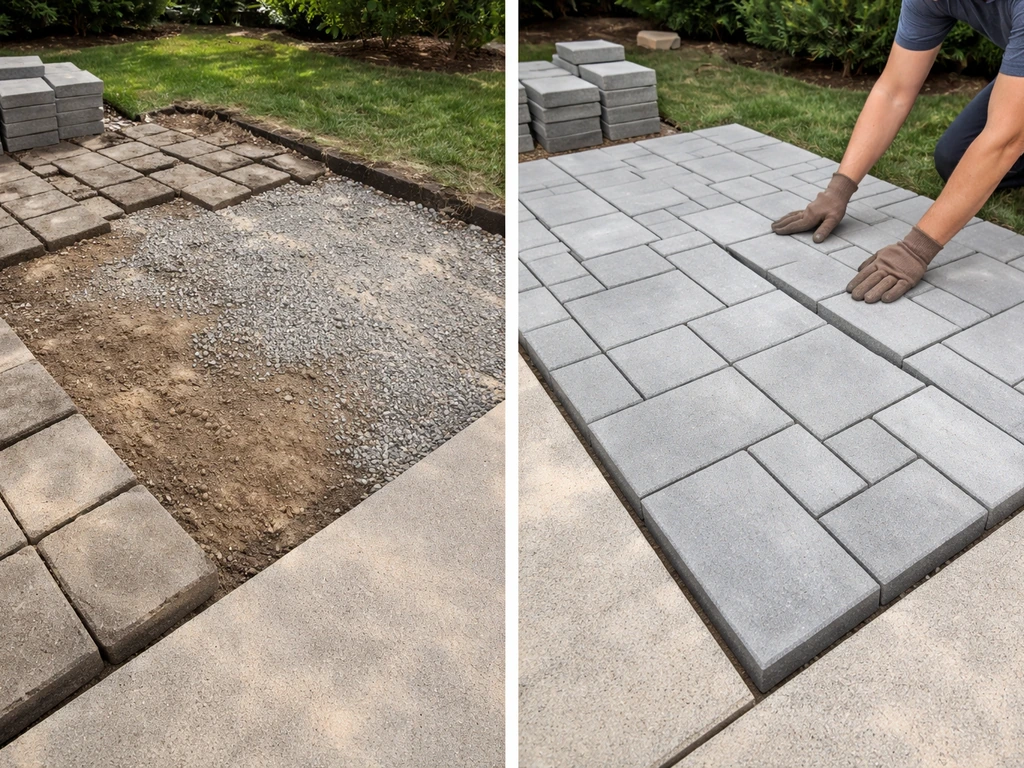
For a pedestrian patio, you need at least 6 inches of compacted gravel base plus your surface material thickness. That means excavating roughly 10 inches below your target finished grade for a paver patio (6 inches gravel base + 1 inch bedding sand + roughly 2.5–3 inches of paver thickness). For poured concrete, you need at least 4 inches of concrete plus a 4-inch gravel sub-base, so excavate 8 inches below finished grade minimum. For gravel patios, 4–6 inches of compacted base material is typical. Mark your target depth with stakes and check frequently as you dig.
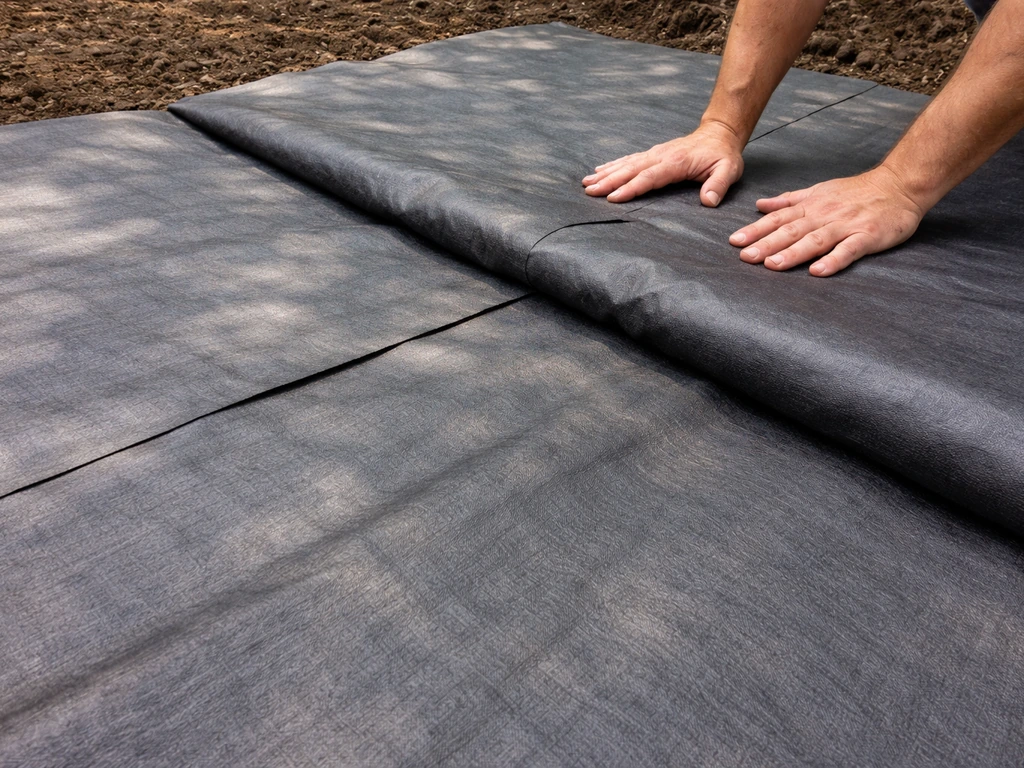
Geotextile fabric
Once you've excavated to depth and roughly graded your subgrade to slope, lay a geotextile landscape fabric across the entire excavated area before adding gravel. This is a step lots of DIYers skip to save a few bucks, but it prevents fine soil particles from migrating up into your gravel base over time, which is exactly what causes slow settling and surface movement years later. Overlap seams by at least 6 inches and pull it taut against the edges. If your existing base failed partly because of soil contamination in the gravel, this is what fixes it going forward.
Gravel base and compaction
Use crusher run, Class II base, or processed gravel (not smooth river rock, which won't interlock and compact properly). Add it in 2-to-3-inch lifts and compact each lift with a plate compactor before adding the next. This step takes time but don't skip it. Running the plate compactor in two directions (perpendicular passes) on each lift gives you more even compaction. Check your slope with a long level after each pass and adjust before moving on. Your finished compacted base should hold your target drainage slope all the way across.
Edging
For paver patios, plastic or aluminum paver edging staked into the ground around the perimeter is essential. It keeps the edge pavers from spreading outward over time, which causes the whole field to loosen. Install edging after the base is complete but before bedding sand goes down. For concrete, your form boards serve this function during the pour, and the finished slab edge holds itself.
Choosing your surface material
The right surface depends on your budget, your climate, how much maintenance you're willing to do, and honestly how much skill you want to develop. Here's a straight comparison.
| Material | DIY Difficulty | Approx. Material Cost (per sq ft) | Freeze-Thaw Performance | Maintenance | Best For |
|---|---|---|---|---|---|
| Concrete | Moderate-Hard | $4–$8 | Good if air-entrained | Low (seal every 2–3 yrs) | Clean look, large areas, permanent |
| Concrete Pavers/Brick | Moderate | $3–$12 | Good (individual pieces flex) | Low-Moderate (rejoint every few years) | Flexible repair, classic look |
| Natural Stone Pavers | Moderate | $8–$20+ | Varies by stone type | Low-Moderate | High-end aesthetic, durability |
| Gravel/Crushed Stone | Easy | $1–$3 | Excellent (drains freely) | Moderate (raking, top-up) | Budget builds, informal style |
| Composite/Wood Decking | Moderate | $5–$15 | Good if elevated/vented | Low (composite) to High (wood) | Sloped or uneven ground, deck feel |
My practical take: for most DIYers replacing a standard backyard patio, concrete pavers or brick are the sweet spot. If you are looking at an existing patio and wondering how to upgrade patio materials without repeating the same mistakes, focus first on the base and drainage so the new surface lasts backyard patio.
You get a durable, attractive surface, the installation is forgiving (you can pull and relay individual pieces if something goes wrong), and the base system is the same one described in this guide. Poured concrete is the best long-term value in flat climates but is less forgiving to pour yourself, getting the finishing and curing right takes practice. Gravel is the fastest and cheapest route and works surprisingly well for casual spaces.
Composite or wood works best when the ground has significant slope and a raised-deck approach makes more sense than a ground-level slab.
Installation steps by surface type
Pavers and brick
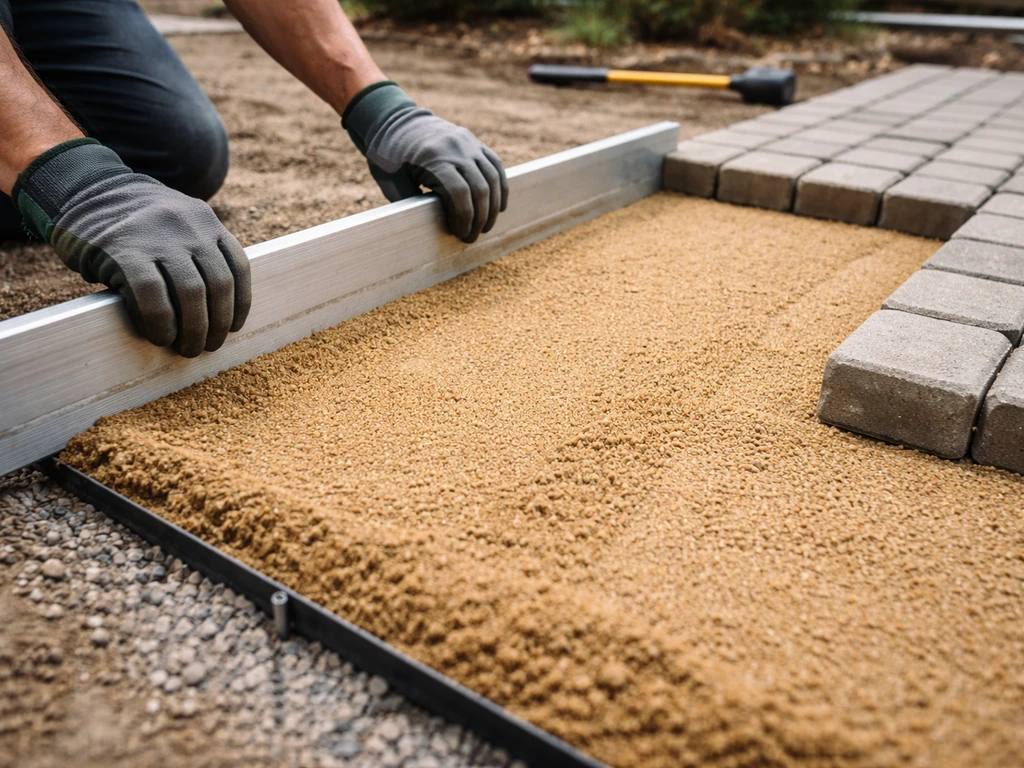
- With your compacted gravel base complete and edging installed, spread a 1-inch layer of coarse bedding sand (not mason sand or fine sand) over the base.
- Screed the sand flat using two 1-inch pipes as guides and a straight 2x4 dragged across them. Do not compact the sand—it should stay loose for setting.
- Lay pavers in your chosen pattern starting from a fixed straight edge (usually the house side). Keep joints tight and consistent—typically 1/8 to 3/16 inch.
- Check every few rows with a level and string line. Tap high spots down gently with a rubber mallet. Do not walk on unset pavers.
- Once all pavers are laid, run the plate compactor over the entire surface (use a rubber pad under the plate to avoid scratching) to seat them firmly into the bedding sand.
- Spread polymeric sand over the surface and sweep it into the joints with a push broom until joints are full to within 1/8 inch of the top.
- Run the plate compactor over the surface again to vibrate the polymeric sand deeper into the joints.
- Remove all excess polymeric sand from the surface with a leaf blower on low, then mist the entire surface gently with water to activate the binders. Follow the manufacturer's cure time—typically 24 hours without traffic.
Poured concrete
Form up the slab perimeter with 2x4 or 2x6 boards staked firmly into the ground, set to your target finished height and slope. For freeze-thaw climates, specify air-entrained concrete (typically 5–7% air content) when you order your ready-mix, this dramatically improves resistance to spalling from freeze-thaw cycles. Pour and screed the concrete flat, then finish with a float and a broom finish for slip resistance.
Cut control joints to about 1/4 the slab depth within 6–12 hours of the pour, spaced roughly 8–12 feet apart for a 4-inch slab (about 2–3 times the slab thickness in feet). Keep the slab moist and covered for at least 7 days to cure properly. Don't let anyone walk on it for 24–48 hours, and hold off on furniture and heavy use until the 28-day mark when concrete reaches full design strength.
Gravel
With your geotextile and compacted sub-base in place, simply add your decorative gravel (pea gravel, crushed granite, or decomposed granite are popular choices) at a finished depth of 2–3 inches. Rake level, then compact lightly. Install a solid edging system, metal or composite landscape edging, to keep gravel from migrating. That's genuinely most of it. The main ongoing task is raking it back into shape and adding a thin top-up every year or two.
Composite or wood
For a ground-level composite or wood patio, install pressure-treated 4x4 or 4x6 sleepers on your compacted gravel base, spaced 16 inches on center, shimmed to your target slope. Lay composite or pressure-treated decking boards perpendicular to the sleepers with manufacturer-specified gaps for drainage and expansion. Composite typically uses hidden clip fasteners; wood uses face screws or hidden fasteners. Leave a gap between the outer board and any edging for water to exit. Composite needs almost no maintenance beyond occasional washing; natural wood needs annual sealing or staining to prevent rot.
Quality checks, common problems, and when to stop and call a pro
Check these before you call the project done
- Slope check: hold a long level on the surface and verify you have consistent fall away from the house across the full width. No flat or reverse-sloping sections.
- Edge stability: push firmly on the perimeter pavers or check the concrete edge forms before the pour. Any flex means edging needs reinforcement.
- Joint fill: for pavers, press a screwdriver into the polymeric sand joints. They should feel firm after curing, not loose or powdery.
- Drainage test: run a hose on the finished surface for a few minutes and watch where the water goes. It should sheet off cleanly toward the yard, not pool anywhere.
- Surface uniformity: walk the whole patio slowly and feel for any rocking pavers or high spots in concrete. Fix these before calling it done.
Common problems and fixes
Uneven settling after the first winter is usually a sign of insufficient base compaction or skipping the geotextile. For pavers, the fix is relatively painless: pull the affected section, add and recompact base material, reset the pavers, and re-joint. For concrete, you're looking at grinding high spots or mudjacking low spots, which is harder to DIY cleanly.
Polymeric sand washing out is almost always caused by activating it in the wrong conditions (rain within 24 hours, temperature too low) or not sweeping out all the excess before misting. Sweep it out and redo the affected joints when conditions are right.
Concrete cracking beyond control joints is usually caused by base failure, inadequate thickness, or curing too fast in hot weather. Minor cracks can be filled with a flexible concrete caulk. Widespread cracking that follows movement indicates base problems and points back to a replacement rather than a repair.
When to bring in a pro
Call a licensed contractor before starting if: your project requires a building permit (check with your local municipality, most jurisdictions require permits for patios over a certain size or attached to the house), you hit utility lines or conduit during demo, the soil under the old patio is visibly soft or saturated even in dry weather (indicating drainage issues that need engineered solutions), or the patio area involves significant grade changes that would require retaining structures. Also consider hiring out the concrete pour itself if you've never done it before, finishing fresh concrete is a skill that has a real learning curve, and there's a narrow window to get it right.
For everything else on this list, including demolition, base construction, and paver installation, a prepared DIYer with a free weekend and rented equipment can absolutely handle it. The projects that go wrong for DIYers are almost always ones where the base was rushed. Take your time on excavation, compaction, and slope, and the surface installation is genuinely straightforward. If you're not doing a full replacement and instead want to improve what you have, topics like how to renovate, update, or transform an existing patio cover lighter-touch approaches that can deliver big results with less digging.
FAQ
Can I resurface over my existing patio instead of replacing it?
You can, but only if the slab is still firmly bonded and fully supported. A good DIY check is tapping and probing, look for hollow spots (voids) and shifted movement underfoot. If you find any areas that lift or move when pressed, a resurfacing product will usually just hide the problem until the new surface fails.
If my patio is already sloped, do I still need to rebuild for drainage?
Yes, but you still need to meet the drainage slope on the finished surface. Add the base in a way that restores the slope away from the house, then adjust bedding thickness (for pavers) so the tops of all units end up at the correct grade.
Do I really need geotextile fabric under the base?
It depends on what failed. If your old base was contaminated (mixed with topsoil, organic matter, or fines) the new gravel will settle the same way unless you isolate it. The usual decision is to install geotextile whenever the subgrade is at risk of pumping, or when you had any uneven settling or muddy returns during excavation.
How do I know my compacted base is strong enough?
Plan on getting the compaction right before you add bedding sand or any surface. A simple test is to walk the compacted base, it should feel firm and not rut under steady pressure. If you can push a screwdriver into the base easily, it is not compacted enough and you should recompact before proceeding.
What happens if I skip paver edging?
For pavers, do not skip edging, even if the patio is small. Edge restraint helps prevent outward creep as joints fill and expand, especially in wet freeze-thaw regions. Make sure edging is installed after base compaction but before bedding sand.
Can I just fill cracks or patch spalled areas instead of replacing?
Use flexible patching materials for cosmetic issues only. If you have cracks that are uneven, roots have lifted sections, or you see water pooling after rain, those are movement or drainage failures, and patching will not stop the underlying cause.
Can I increase the patio height or change it near the house?
Yes, but make sure you can maintain slope at doorways and transitions. For example, raising the patio too much can create a step-up trip hazard or prevent doors from clearing properly. Measure the finished height relative to the threshold before you choose thickness and base depth.
How does clay soil change the replacement plan?
Yes, because load and material choice change with soil and climate. If you have clay, consider increasing base thickness and improving perimeter drainage, for example a gravel trench at the low edge. Also expect more frequent raking and top-ups for gravel, since clay-driven movement can shift fines into joints.
What should I do if weather delays the project mid-excavation?
If you must pause, keep the excavated subgrade protected and prevent it from getting saturated. Cover or tarp exposed areas temporarily so you do not end up compacting wet soil or building base over mud. Once you start placing gravel, keep going in sequence so each lift is compacted at the right moisture range.
Why did my polymeric sand wash out, and what can I fix?
Not if you want it to last. Polymeric sand needs joint conditions that match the product instructions, too much water before it sets or misting at the wrong time can cause washout. If you notice joints emptying, redo the joints after confirming proper temperature and dry timing.
Why did my concrete crack after installation, and can I correct it?
For a concrete slab, control joints must be cut on time, within the workable window after finishing. If joints were missed or cut too late, cracking can form randomly and you cannot correct it with caulk alone. For freeze-thaw areas, air-entrained concrete also matters, it reduces spalling risk.
If one section settles, do I have to redo the entire patio?
Sometimes, especially for pavers, but only if the issue is localized. You generally pull the affected units, rebuild and recompact the base in that area, then reset. If the whole patio shows widespread heaving or repeating low spots, the better fix is to remove more of the base system.
How do I estimate how much material to order for a full replacement?
Make a material list that includes waste, edge pieces, and bedding sand volume. As a practical rule, order extra pavers or concrete pieces to cover cutting losses and breakage during demo. Also account for how many specialty pieces you will need at curves, steps, and transitions.
Do I always need a building permit to replace a patio?
Yes, permits can matter for patios attached to the house, patios over certain sizes, and any work that changes drainage or grading. Also consider that local rules may apply to driveway-adjacent areas and stormwater runoff, so check before you pour or raise finished grade.
How should I plan disposal for concrete, pavers, and wood?
You usually need a dumpster for demo, but renting one rated for heavy construction debris matters. Concrete is heavy, so confirm the weight limit before scheduling. Also separate waste streams if your area charges less for separated loads, for example clean wood versus mixed construction debris.
Is it worth hiring a contractor for the pour?
Hiring out the concrete pour can be worth it when you cannot meet the curing and finishing timeline. Concrete is sensitive to finishing technique and timing, and ready-mix delivery windows can force mistakes. For pavers and gravel, DIY is usually more forgiving, because you can relay individual sections if something looks off.
Next Article
How to Redo a Patio Step-by-Step DIY Guide
Step-by-step DIY guide on how to redo a patio, from base prep and drainage to pavers, gravel, composite, or wood install