You can absolutely build a raised patio directly over grass, and you don't need a contractor to do it. The core process is: kill or remove the turf, build up a compacted gravel base with proper drainage slope, frame your raised structure if you're going more than a few inches above grade, then lay your surface material of choice. Done right, it stays level, drains well, and lasts for years without shifting. Done wrong, you get a wobbly, soggy mess by spring. This guide walks you through every step so you end up with the first result, not the second.
How to Build a Raised Patio on Grass: Step by Step DIY

Nolan Lennox
14 Jun 2026
Planning and measurements before you dig a single shovel
Start on paper, not in the yard. Sketch out the footprint you want, measure it twice, and figure out your elevation goal before you touch the grass. A small patio on grass (say, 10x12 feet) is very manageable as a solo DIY weekend project. Now that you know the overall size and elevation, you can follow the steps for a cheap patio on grass using a solid base and simple surface materials how to make a cheap patio on grass. Anything over 200 square feet or more than 18 inches above grade starts to demand more planning, more muscle, and honestly a helper.
The most important dimension to settle early is your finished height. A low raised patio (3 to 6 inches above the surrounding lawn) just needs a solid compacted base and maybe a simple border. A truly raised patio (12 to 24 inches or more) needs a proper structural frame, footings, and anchoring. Most DIYers building over grass land somewhere in between, usually 4 to 8 inches above grade, which lets you keep it simple without digging footings.
Plan your drainage slope from the start. The target is about a 2% grade, which works out to roughly 1/4 inch of drop per foot. On a 12-foot-deep patio, that's 3 inches of total drop from the house side to the outer edge. That sounds like a lot, but you won't notice it visually, and it's what keeps water moving away from your foundation instead of pooling under your new patio.
- Mark the full perimeter with stakes and string lines before removing any turf
- Measure the existing ground slope with a line level or a long level and a tape measure
- Decide your finished height relative to any door thresholds, steps, or adjacent structures
- Check local building codes: many areas require a permit for structures over a certain height or square footage
- Call 811 (in the US) to have underground utilities marked before any digging
Site prep: removing turf and getting a stable base underfoot
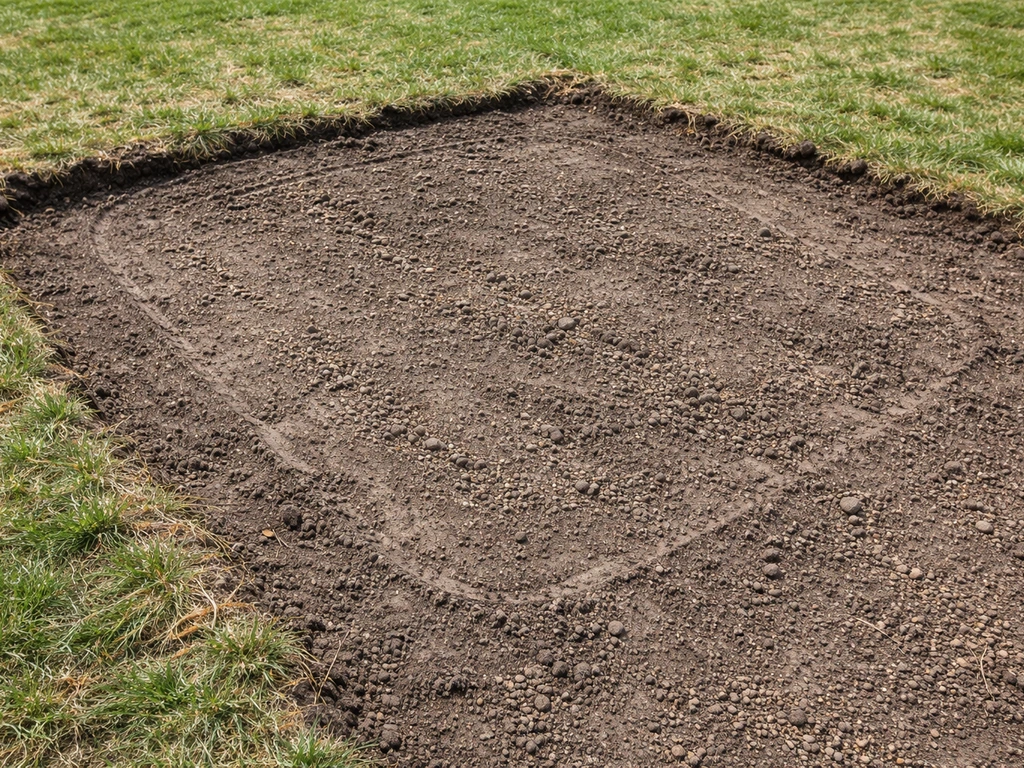
This is the step most people underestimate, and it's the one that causes most of the problems later. Grass and topsoil compress and decompose over time. If you build on top of living turf or loose organic soil without dealing with it first, your patio will shift, sink, and get lumpy within a season or two. If your patio area is near a leach field, you should plan the structure and drainage carefully to avoid interfering with wastewater dispersal.
Option 1: Remove the sod entirely
For a permanent, hard-surface patio (pavers, brick, concrete), full sod removal is the right call. Use a flat spade or rent a sod cutter (around $80 to $100 a day) to cut and peel back the grass layer. You want to remove about 2 to 3 inches of sod and root zone, then continue digging down to your total excavation depth. For a paver patio, that's typically 6 to 7 inches below your planned finished surface to account for the base layers. Roll the sod and either compost it or use it to patch bare spots elsewhere in the yard.
Option 2: Smother the grass in place
For a raised wood or composite deck frame built over grass, you can skip full removal and smother the turf instead. Layer cardboard (overlapping by at least 6 inches at seams) or several sheets of newspaper directly on the lawn, then cover it with your gravel base. University extension research backs this up: cardboard and weed barriers effectively kill off grass underneath when secured at the edges and covered with weight. It breaks down slowly and won't destabilize your base. This approach also saves a ton of labor, which is why it's popular for budget patio builds.
Whichever method you use, the subgrade beneath your base needs to be firm. If the soil is soft, waterlogged, or full of roots, compact it with a hand tamper or a rented plate compactor before adding any base material. The goal is a compacted subgrade at roughly 95% of its maximum dry density. That sounds technical, but it basically means: if it doesn't feel rock-solid under your feet after compacting, compact it more.
Base layers and drainage: the part that actually makes it last
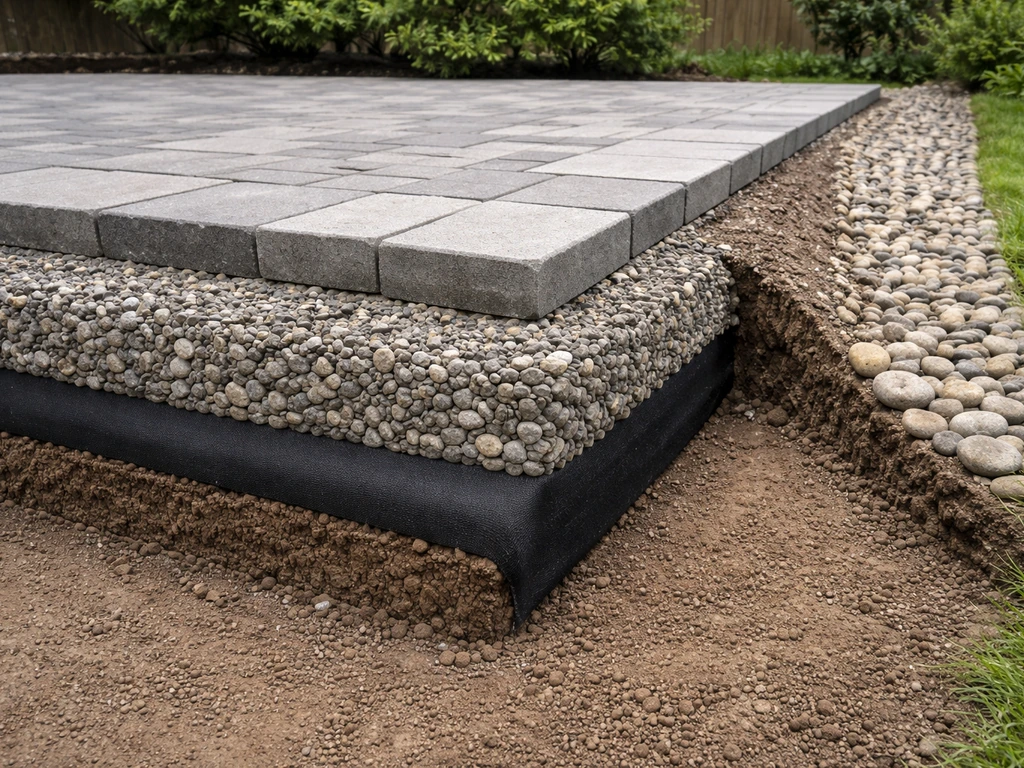
A proper base is what separates a patio that looks great for 15 years from one that's heaving and uneven after the first winter. For a paver or brick surface, the standard build-up is 4 to 6 inches of compacted crushed stone aggregate topped with about 1 inch of bedding sand. For a raised wood or composite frame, you're mostly focused on getting solid, level footing points and ensuring water can drain freely under and around the structure.
- Lay landscape fabric over the compacted subgrade (or your cardboard smothering layer) to suppress future weed growth without blocking drainage
- Add 4 to 6 inches of 3/4-inch crushed stone (also called crusher run or road base) in two or three layers, compacting each layer with a plate compactor before adding the next
- Check your drainage slope with a level and string line as you build up each layer — it's much easier to correct now than after the surface is down
- Add a 1-inch screed layer of coarse bedding sand (for pavers/brick) and use a straight board to level it to your slope
- Do not compact the sand layer — it needs to stay loose so pavers can be set and adjusted
Drainage is worth a separate moment of attention. If your yard already slopes away from the house, great, your base slope will follow naturally. If your yard is flat or crowns toward the house, you need to be intentional about building in that 1/4-inch-per-foot drop across the patio surface. In extreme cases (low-lying yards, clay-heavy soils), consider installing a perforated drain pipe at the outer edge of the patio before you close everything up. A little work now saves a flooding headache later.
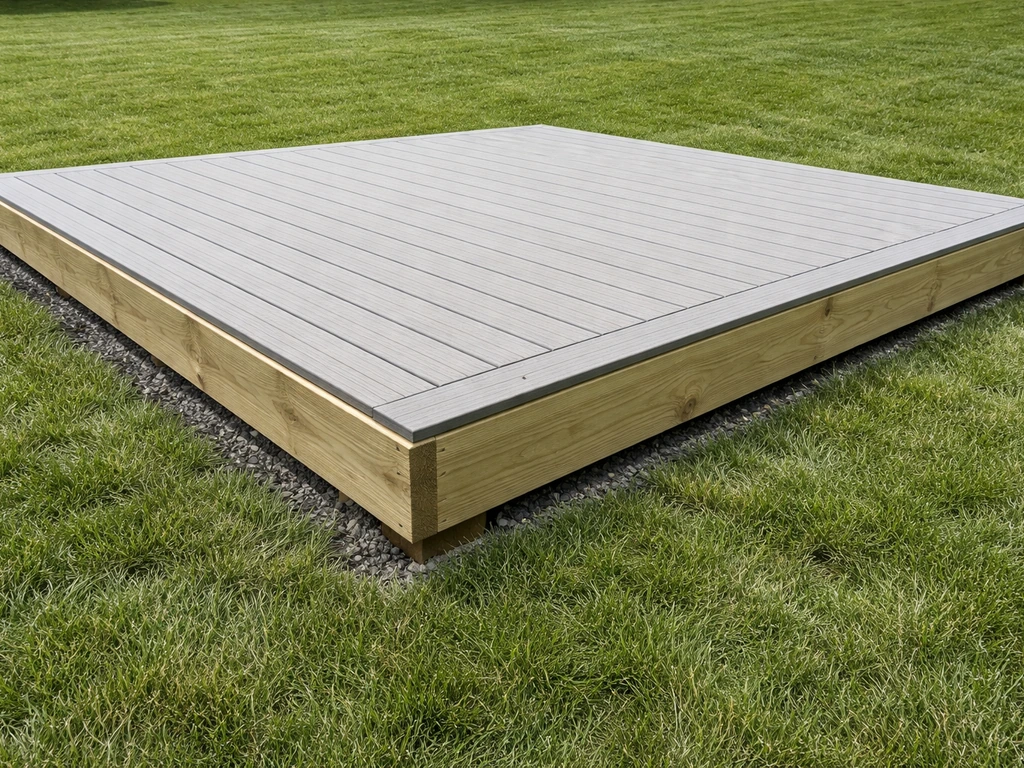
Framing and elevation: building the raised structure safely
If your patio sits only a few inches above grade and you're using pavers or gravel, the compacted base is your structure. But if you're building a wood or composite platform raised 8 inches or more, you need a proper frame. This is where a lot of DIYers get nervous, but it's very manageable if you think of it like building a simple floor.
For a raised platform patio, the basic components are footings (concrete piers or deck blocks set into the ground), beams running across the footings, and joists spanning between the beams to support your decking surface. Deck blocks are the beginner-friendly option: they sit on the compacted gravel base, require no concrete mixing, and work well for platforms up to about 12 to 18 inches above grade. For anything higher, poured concrete footings below the frost line are the safer, code-compliant choice.
Use pressure-treated lumber for anything in contact with or close to the ground. For a standard backyard raised patio platform, 4x4 posts on deck blocks, doubled 2x8 beams, and 2x6 joists spaced 16 inches on center is a solid, proven framing approach. Use joist hanger hardware at every connection, it's cheap, fast, and dramatically stronger than toe-nailing alone. If you're using composite decking boards on top, follow the manufacturer's joist spacing recommendation, which is sometimes 12 inches on center for certain board profiles.
- Set deck blocks or footings at all four corners and every 6 to 8 feet along the beams
- Use a 4-foot or longer level to make sure all your support points are at the same height before framing
- Build the perimeter frame (rim joists) first, then fill in interior joists
- Leave a 1/8-inch gap between decking boards for drainage and expansion
- Install cross-bracing or blocking between joists if the platform is more than 24 inches above grade for lateral stability
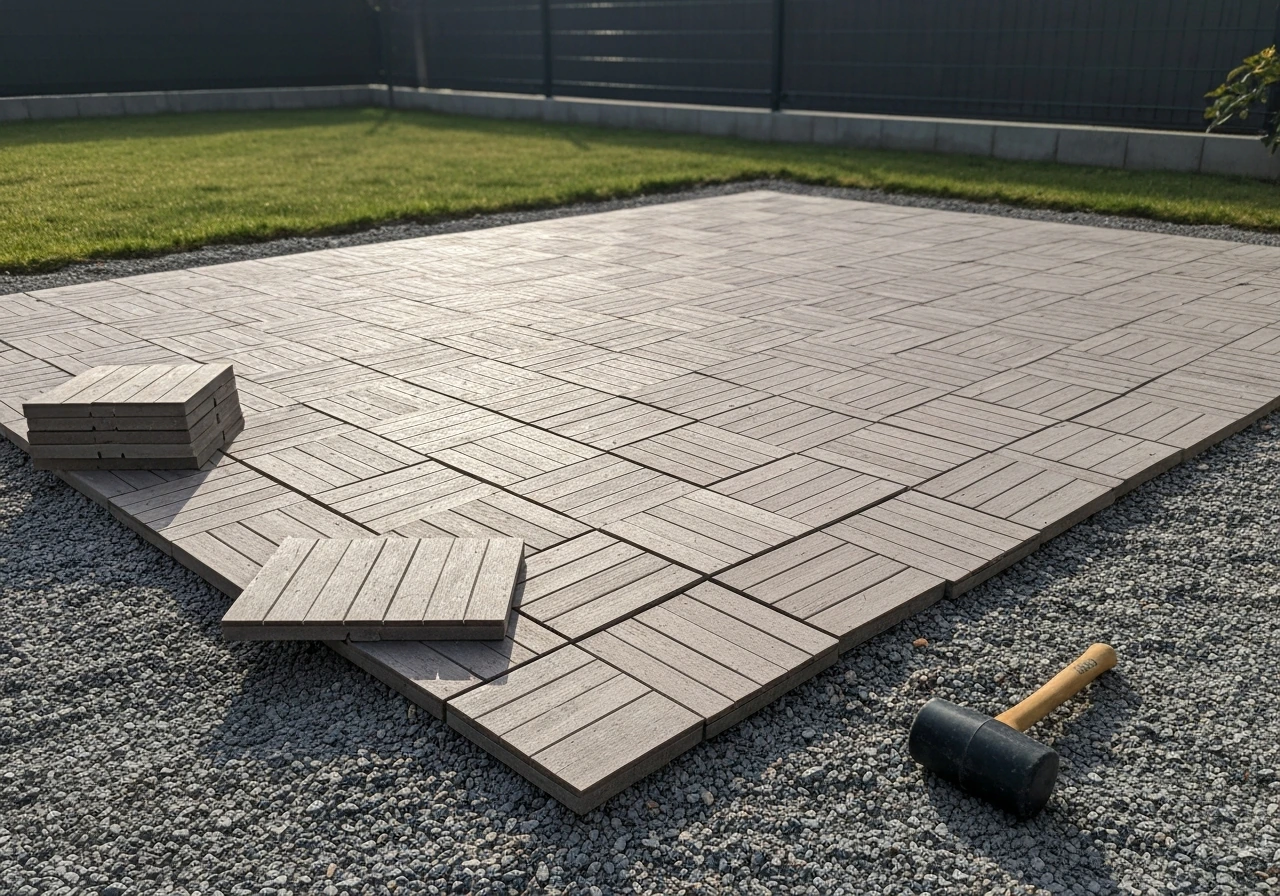
Surface materials: picking what works for your budget and skill level

The surface you choose affects cost, maintenance, and how hard the installation is. Here's a direct comparison of the most common DIY-friendly options for a raised patio on grass.
| Material | Approx. Cost Per Sq Ft | DIY Difficulty | Durability | Maintenance |
|---|---|---|---|---|
| Concrete pavers | $3–$8 | Moderate | Very high (25+ yrs) | Low — re-level occasionally |
| Natural brick | $4–$10 | Moderate | High (20+ yrs) | Low — may need re-sanding |
| Pressure-treated wood decking | $2–$5 | Easy–Moderate | Good (10–15 yrs) | Annual sealing recommended |
| Composite decking | $5–$12 | Easy–Moderate | Very high (25+ yrs) | Very low — wash annually |
| Pea gravel / decomposed granite | $1–$3 | Easy | Moderate (needs topping up) | Moderate — rake and replenish |
For a raised patio specifically built on a frame (wood or composite surface over joists), composite decking is the standout recommendation if your budget allows. It won't rot, warp, or splinter, and it essentially eliminates the annual maintenance burden that comes with pressure-treated wood. If you're doing a ground-level or low-raised paver patio, concrete pavers give you the best combination of durability, repairability (just pull and relay individual units), and DIY-friendliness. Gravel is the cheapest entry point and works great as a budget patio surface, though it's better suited to informal spaces and needs occasional replenishment.
If you're looking at a cheaper approach and want to avoid framing altogether, there are simpler options worth knowing about. A ground-level patio laid directly on a compacted gravel base, or a stepping-stone setup, keeps costs and complexity way down. That territory overlaps with what you might consider a more casual or temporary patio on grass.
Finishing details: edges, leveling, and keeping it solid long-term
The last 10% of a patio build is where a lot of people cut corners, and it's also where the long-term durability gets decided. Don't skip the finishing steps.
Edge restraints and borders
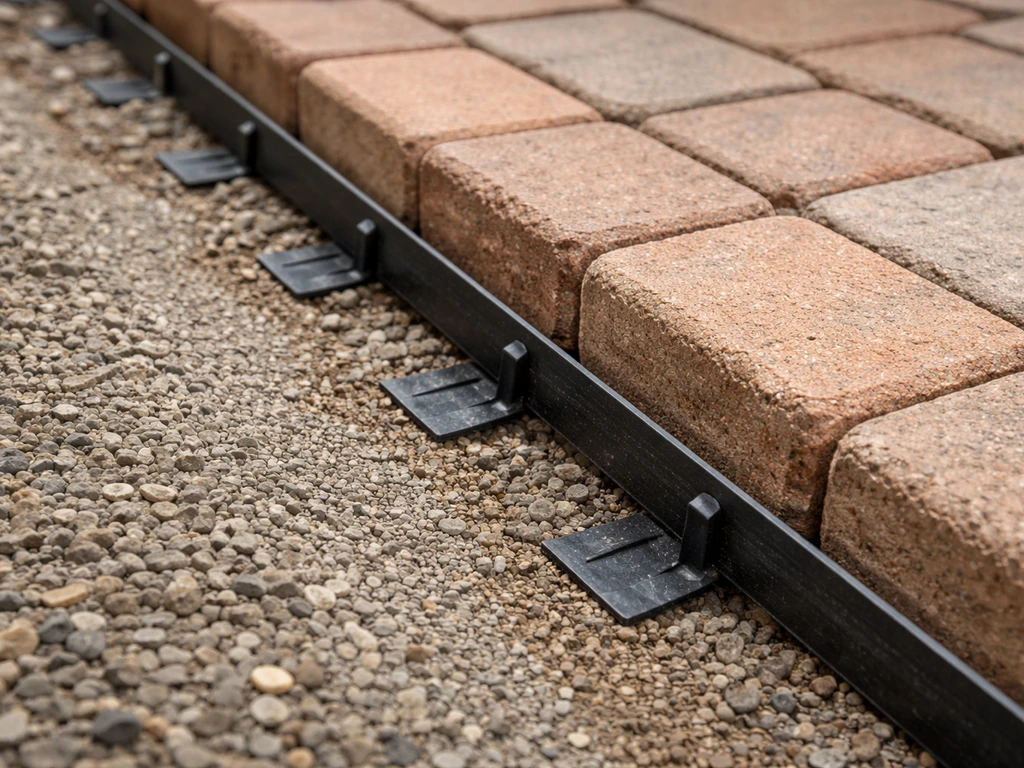
For paver and brick patios, plastic or metal edge restraints spiked into the base gravel are non-negotiable. Without them, the outer pavers slowly migrate outward over time, creating gaps and a wavy perimeter. Install them right against the last row of pavers and drive the spikes every 12 inches. For a wood frame patio, a trim board around the perimeter covers the framing and gives you a clean, finished look. If the platform is elevated, add fascia boards to hide the structure underneath.
Leveling and joint sand
After all pavers are set, sweep polymeric sand into the joints and lightly mist with water to activate it. Polymeric sand hardens slightly and resists ant invasion and weed germination far better than regular jointing sand. Do a final walk across the entire surface and tap down any high spots with a rubber mallet. Check with a level to confirm your drainage slope is still consistent end-to-end. It's normal to need minor adjustments on a few pavers at this stage.
Long-term maintenance to prevent shifting and water problems
A well-built raised patio on grass shouldn't need major attention, but a quick annual check will catch small problems before they become expensive ones. Every spring, walk the surface and look for any sunken, rocking, or raised pavers, catch them early and it's a 10-minute fix. Plate compaction is recommended over loose granular base, and signs like settling or rocking point to sub-base density that wasn't achieved correctly. For wood frame patios, inspect the ledger board connection (if attached to the house), check for soft spots in decking boards, and re-seal pressure-treated wood every year or two. Keep the area under and around the patio clear of debris buildup that could trap moisture and accelerate rot or frost heave.
- Re-sweep polymeric sand into paver joints every 1 to 2 years as it gradually settles out
- Check that drainage slope is intact each spring after freeze-thaw cycles
- Trim back any grass or plants encroaching on paver edges to prevent root undermining
- For wood or composite platforms, inspect all hardware connections annually for rust or loosening
- Re-level any sunken deck blocks or footing points immediately — small shifts compound quickly if ignored
- If pooling water appears on the surface, re-check the slope and add or regrade fill material at the high side as needed
Building a raised patio on grass is one of those projects that feels daunting on day one and incredibly satisfying by day two. If you want something you can install quickly and reuse later, follow these same base and drainage principles but aim for a temporary patio setup instead how to make a temporary patio. The work is front-loaded: plan carefully, prep the base thoroughly, and nail your drainage slope. Once those three things are done right, the rest of the build follows naturally and the result is a solid outdoor space you built yourself, on your terms and your budget.
FAQ
Can I build a raised patio on grass without removing all the sod?
It depends on the surface. For pavers or other hard surfaces, you generally need to remove the sod and root zone so the base does not settle later. For a wood or composite deck on joists, you can usually smother the turf first with layered cardboard or overlapping newspaper, but you still need a compacted, well-draining gravel base and secure the edges so it doesn't shift.
How thick should the gravel base be for a raised patio on grass?
Most DIY hard-surface patios end up around 6 to 7 inches total excavation below the finished surface, which typically translates to about 4 to 6 inches of compacted crushed stone plus roughly 1 inch of bedding sand. If your patio is only slightly raised and you choose a simpler surface, verify total thickness still matches your height plan and allows room for paver height (or decking frame) plus slope.
What happens if I miss the drainage slope by a little?
Small errors can show up quickly in wet seasons as areas that stay saturated, then compact unevenly. Use a long straightedge or string line to check consistent drop across the entire footprint before you lock in bedding sand or fasten deck framing, and re-check the slope after you compact each layer.
Do I need a geotextile fabric under the gravel?
Often yes, especially if you have loamy soil, clay, or lots of roots. Fabric helps reduce pumping of fines into the gravel, which is a common reason patios slowly lose stability. Don’t use it as a substitute for compacted subgrade, and keep seams overlapped so base material does not migrate.
How do I keep the patio from sinking after the build?
The main causes are building on soft subgrade, skipping compaction, or placing the base on decomposing organic material. Compact the native soil to a rock-solid feel (and ideally around the density target you can achieve), remove loose topsoil and roots, and avoid overwatering the base before it’s covered.
Can I build over grass if the soil is clay-heavy or waterlogged?
You can, but you may need extra drainage measures. Plan for stronger subgrade compaction, consider extending the gravel base slightly beyond the patio footprint, and in low areas consider an exterior perforated drain pipe at the low edge before you close everything up.
What’s the difference between building a low raised patio and a truly raised platform?
Low raised patios (roughly 3 to 6 inches above grade) are usually base-driven, meaning the compacted gravel structure carries the load and keeps things level. Platforms raised 8 inches or more usually need a structural frame with footings, because the deck boards and joists create concentrated loads that the base alone cannot reliably support.
How do I know whether to use deck blocks or concrete footings?
Deck blocks are usually fine for shorter platforms (commonly around 12 to 18 inches above grade) when installed on properly compacted gravel and placed on solid support points. For taller builds, colder climates, or local code requirements, poured footings below the frost line are the safer and often code-compliant option.
Should I attach the raised deck ledger board to the house?
You can, but it creates a moisture and flashing responsibility. If you attach to the house, ensure proper flashing and keep the wood protected, inspect connections for movement, and leave appropriate spacing for drainage rather than trapping water behind siding or trim.
How far should the patio extend away from the house for good drainage?
A common starting point is to ensure the finished surface has the planned 2% grade away from the house and that the outer edge is not lower than nearby low spots. Practically, you want water to move out toward natural drainage features instead of toward the foundation, so measure existing yard contours and design the slope across the full footprint.
How do I prevent pavers from migrating at the edges?
Install edge restraints at the perimeter and keep them tight against the last row. Drive spikes at regular intervals (commonly about every 12 inches) and avoid relying on the base sand alone, since edge creep usually starts where restraint is missing or the base is under-compacted.
Is polymeric sand necessary between paver joints?
It’s not always required, but it helps. Polymeric sand hardens more than regular sand and resists weeds, ants, and joint erosion, which can reduce maintenance. If you use it, follow the activation instructions carefully with light misting, and avoid overwatering because it can disturb joint material.
How often should I check and re-level a raised patio?
Do a quick inspection each spring for rocking or sunken stones. Small adjustments are easiest early, like resetting a few pavers or correcting minor bedding issues, before more extensive base movement turns a local problem into a larger repair.
What’s the best way to make a raised patio reusable later?
If you want something you can move or reconfigure, aim for a temporary or relocatable approach using modular components like paver panels on a compacted gravel base or a removable frame system. Still keep the drainage slope and subgrade compaction priorities, because “temporary” designs fail for the same reasons as permanent ones (settlement and pooling).
Next Article
How to Make a Temporary Patio: Quick DIY Steps
Learn how to make a temporary patio fast with step-by-step DIY setup, leveling, drainage, anchoring, and easy removal.