Getting a patio level comes down to two things: making the surface flat enough to walk and sit on comfortably, and pitching it slightly away from your house so water drains off instead of pooling or soaking into your foundation. That 'slight pitch' is not a flaw, it's intentional. A properly leveled patio slopes about 1/8" to 1/4" per foot away from the house. Miss either piece of this, and you end up with rocking pavers, puddles after rain, or slabs that slowly sink and crack.
How to Get a Patio Level Today: DIY Step by Step Guide

Nolan Lennox
12 Jun 2026

What 'patio level' actually means
When most people say they want a level patio, they mean two slightly different things at once, and mixing them up causes real problems. The first is surface flatness, no rocking stones, no lips between pavers, no dips that collect water. The second is finished height, meaning the patio sits at the right elevation relative to your door threshold, your yard grade, and any adjacent structures. A perfectly flat patio that's too high at the house edge will funnel water toward your foundation. A patio that matches the right height but has uneven individual stones is a trip hazard and looks rough.
There's also a third dimension that people often forget: drainage grade. The surface should look level to the naked eye but actually carry a deliberate slope. Quikrete's guidance puts this at 1/8" (about 3mm) per running foot away from the structure. blank" rel="noopener noreferrer">Brock's installation spec calls for 1/4" per foot. In practice, somewhere between those two figures works well for most residential patios. On a 12-foot-wide patio, that means the far edge is only 1.5" to 3" lower than the house edge, barely noticeable when you're sitting out there, but enough to keep standing water from becoming a recurring problem.
Assessing the site before you touch anything
The biggest mistake I see DIYers make is jumping straight into adding sand or shimming pavers without figuring out what's actually wrong. Spend 30 minutes on assessment and you'll save yourself hours of re-work. There are three things to check: the overall grade, any localized low or high spots, and where the water is actually going after rain.
Measuring your current slope and identifying problem areas
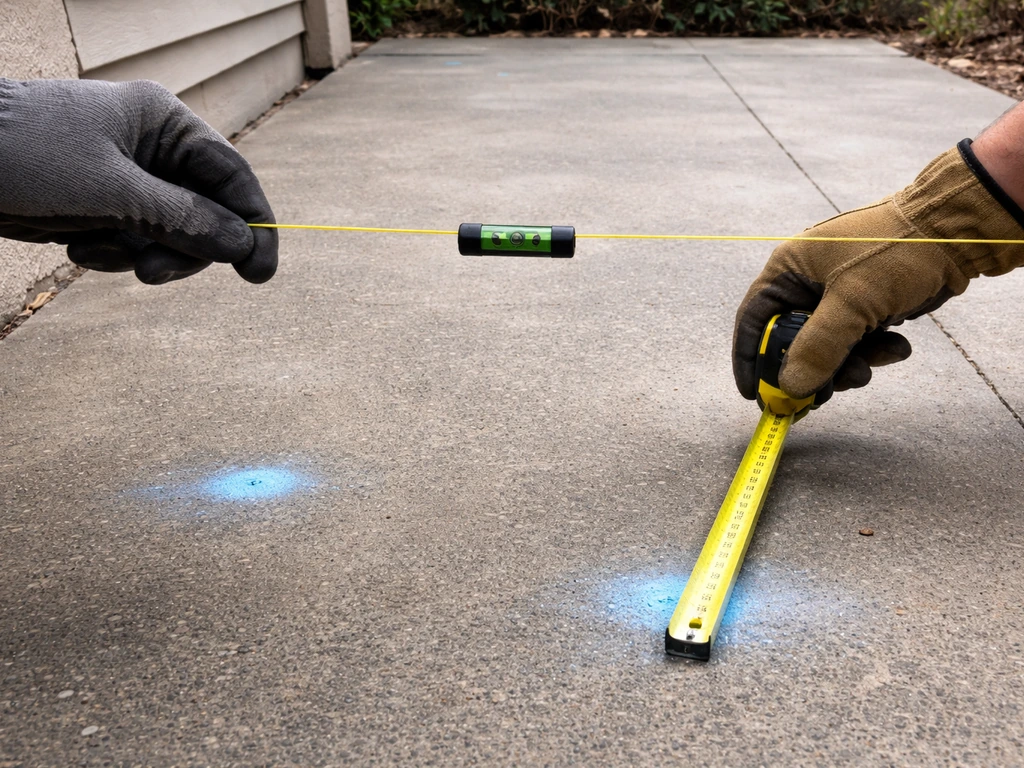
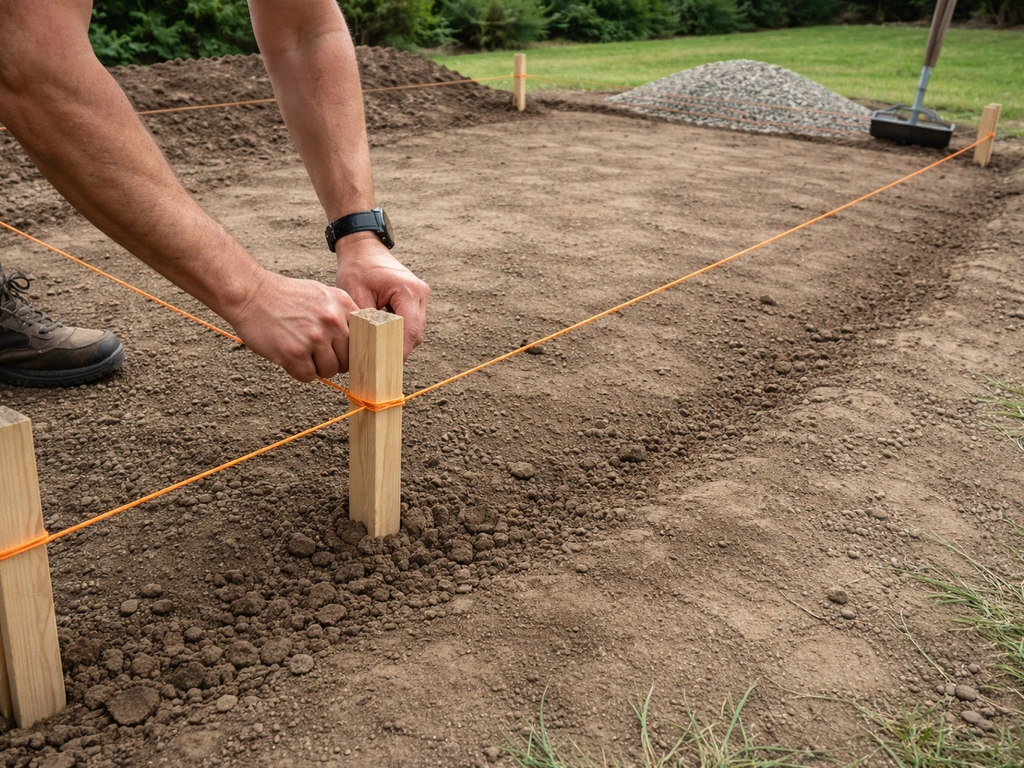
A string line and a line level are your best friends here. Run a taut string from the house edge to the far edge of the patio, clip on a line level, and measure the drop at several points across the width. You're looking for that consistent 1/8" to 1/4" per foot fall.
If you need to raise the patio level, start by determining your current slope and how much elevation change is required from the house edge to the far side how to raise patio level. If you find zero drop or a slope running toward the house, that's your problem. A 4-foot spirit level works for checking individual sections, set it flat, note which side the bubble pulls toward, and work your way across the surface in a grid pattern.
A laser level on a tripod is faster and more accurate if you have access to one, but the string method is totally reliable for most DIY patio work.
Mark low spots with chalk or landscaping spray paint as you go. Note whether any spots are isolated (one or two sunken pavers) or systemic (an entire section has dropped). Isolated problems usually point to a localized base failure or a soft spot in the subgrade. Widespread settlement almost always means the base layer was too thin, wasn't compacted properly, or the subgrade soil wasn't prepared before installation. Knowing which problem you have tells you exactly how deep the fix needs to go.
Checking drainage paths and runoff
Walk the perimeter after a rain (or run a hose on the surface for a few minutes) and watch where water goes. Puddles in the middle mean either a depression in the surface or a drainage grade that's too flat. Water running toward the house is a red flag that needs immediate correction. If you want to raise a patio area, re-establishing the correct drainage grade is usually the first step before you adjust any pavers or slabs. Pay attention to where the patio edges meet the lawn or garden beds, if those areas are higher than the patio surface, water can collect along the border instead of flowing off cleanly.
Choosing the right leveling strategy for your patio type
The right fix depends heavily on what your patio is made of. Pavers and brick on a sand-set base, poured concrete slabs, and loose-laid gravel all behave differently and require different approaches. Here's how to think about each one.
| Patio Type | Common Cause of Unevenness | Primary Fix | DIY Difficulty |
|---|---|---|---|
| Concrete pavers / brick (sand-set) | Sand bedding shifted, base settled, or poor initial compaction | Pull affected units, rebuild base, re-screed bedding sand, reset | Moderate |
| Poured concrete slab | Subgrade settled, tree roots, erosion under slab | Mudjacking, foam lifting, or grinding high spots; full section replacement for severe cases | Moderate to hard |
| Gravel / decomposed granite | Material migration, erosion, foot traffic compression | Add and rake fresh material, re-establish grade with a screed board | Easy |
| Modular/composite deck tiles | Uneven substrate beneath tiles | Shim tiles, re-level substrate, replace damaged tiles | Easy to moderate |
Pavers and brick on a sand-set base
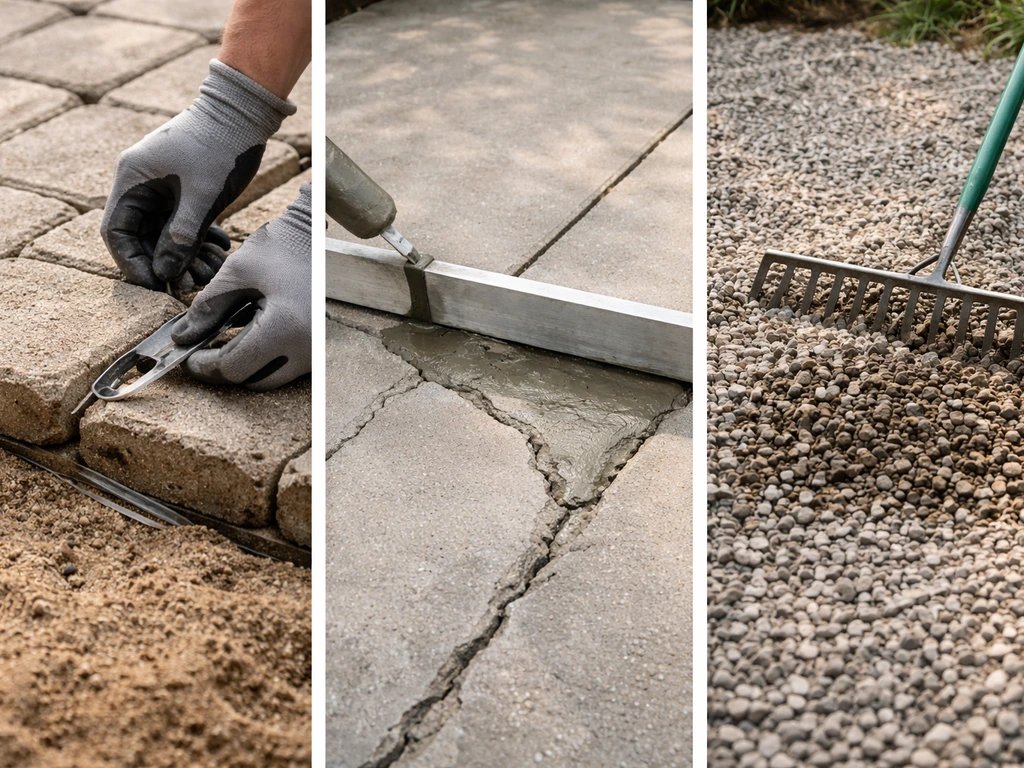
This is the most forgiving type to fix because you can pull individual pavers or entire sections, correct the base, and relay everything without special equipment. The ICPI (Interlocking Concrete Pavement Institute) spec calls for blank" rel="noopener noreferrer">about 1 inch (25mm) of bedding sand on top of a compacted aggregate base, and that bedding layer is where a lot of DIY installs go wrong. People over-fill it trying to fix grade issues at the sand layer, which is exactly backwards. Sand is for fine-tuning flatness only. The grade has to be built into the base course.
Poured concrete slabs
Slabs are trickier because you can't just pull them up and start over without real effort. Minor high spots (lips between sections, small raised areas) can be ground down with an angle grinder and a diamond cup wheel. Low spots that hold water can sometimes be filled with a concrete resurfacer or self-leveling compound if the structural slab is still sound. Larger areas that have sunk due to base failure are candidates for mudjacking (pumping a slurry under the slab to raise it) or polyurethane foam injection lifting, both of which are usually contractor jobs but worth knowing about.
Gravel and loose-laid surfaces
Gravel patios are the easiest to level but need the most ongoing attention. You're essentially re-grading the surface every season or after heavy rain. Add material to low spots, use a long screed board (a 2x4 works fine) to pull and flatten the surface, and check your slope with a level. Decomposed granite compacts better and holds grade longer than loose pea gravel.
Materials and tools you'll actually need
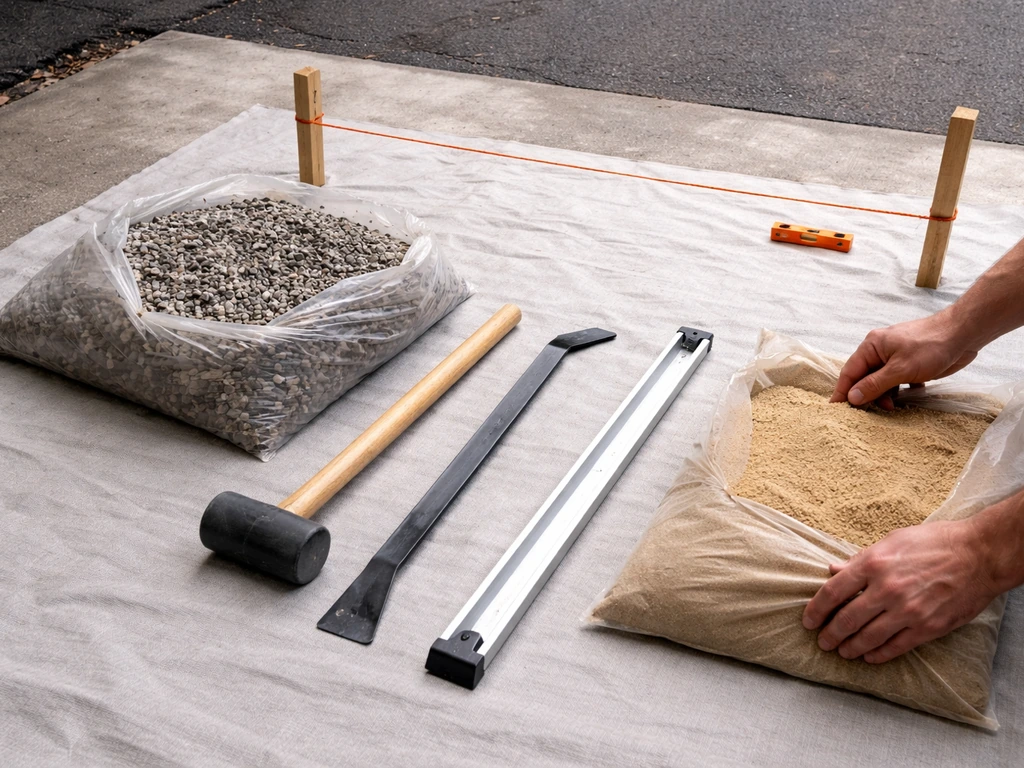
Don't show up at the hardware store without a list. Here's what a complete leveling kit looks like for the most common scenario (sand-set pavers), plus notes on what you can skip for simpler fixes.
- Compactable gravel base (crushed stone, Class II base, or road base): Used for rebuilding the foundational layer. Aim for 4 to 6 inches depth for most residential patios on stable soil, more if you're on clay or expansive soils.
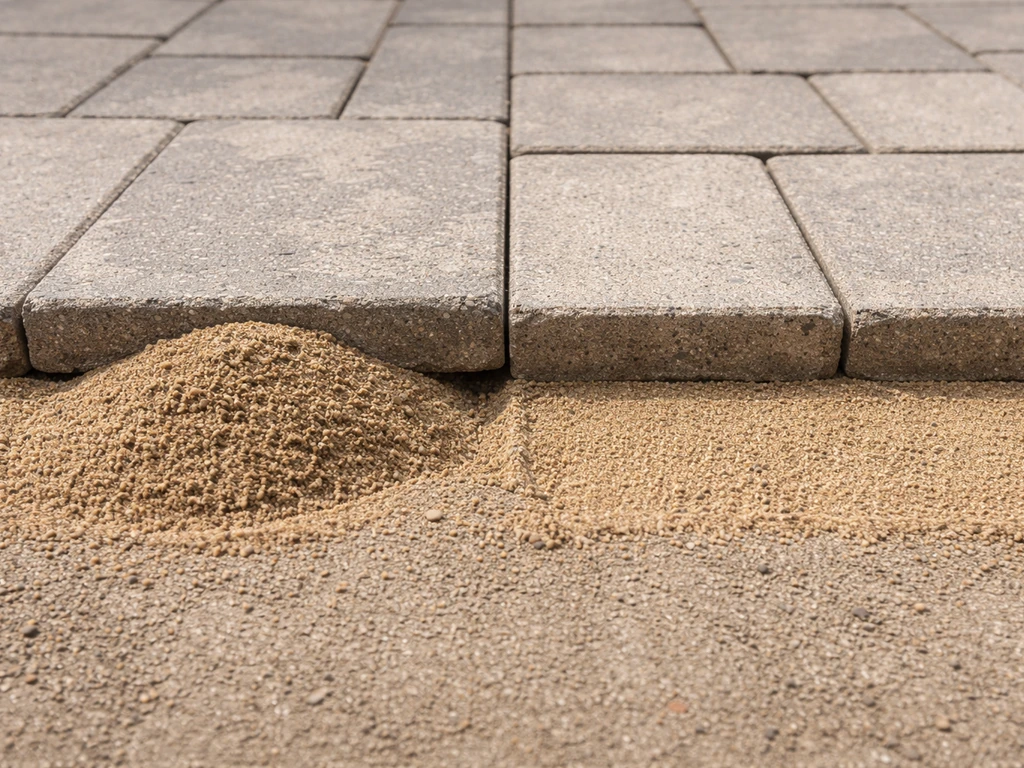
- Bedding sand (coarse, ASTM C33-compliant): The final 1-inch layer that pavers sit on. Use coarse concrete sand, not fine play sand or masonry sand — they compact poorly and migrate.
- Screed rails or pipes (1-inch diameter): Set these in the sand bed to guide your screed board for a consistent 1-inch depth.
- Straight screed board (a flat 2x4 or aluminum screed): Pulled across the sand to create a smooth, even bedding surface.
- String line and line level (or laser level): For establishing and checking your drainage slope before you set a single paver.
- Plate compactor: Rent one for $50 to $75 per day — essential for compacting the base layer and for seating pavers after they're set. A hand tamper works for very small patches.
- Rubber mallet: For tapping individual pavers into the bedding without chipping edges.
- Pry bar and flat screwdriver: For popping individual pavers without damaging neighbors.
- Polymeric sand (for paver joints): Swept into joints after resetting; hardens with water to lock pavers in place and resist washout.
- Geotextile fabric: Placed between the subgrade and base course in problem soils (sandy, loose, or clay-heavy) to prevent base material from mixing into the subgrade over time — an often-skipped step that pays off.
Step-by-step leveling workflow
This workflow is built for the most common DIY scenario: concrete pavers or brick set on a sand and gravel base that has settled or was never graded correctly. If you are wondering how to make ground level for a patio, start by checking the slope and fixing low or high spots in the base before you adjust any sand or pavers pavers or brick set on a sand and gravel base. Adjust the depth of work based on your assessment, a few sunken pavers need far less base work than a whole section that's dropped an inch or more.
- Set your reference lines. Drive stakes at the house edge and the far edge of the patio area. Run a string line between them and use a line level or laser to confirm the string is level. Then lower the far stake by 1/8" to 1/4" for every foot of distance from the house. This is your finished surface target — everything you do below this line should account for paver thickness and your 1-inch bedding sand depth.
- Remove the affected pavers or area. Use a flat pry bar to pop the first paver, then hand-pull the rest. Stack them nearby in the order you removed them if your pattern matters. Set them on a flat surface so they don't chip.
- Excavate and inspect the base. Scrape or dig out the existing bedding sand. Look at the base layer: is it compacted gravel, or just dirt? Soft, loose, or absent base is the root cause of most settlement problems. If you're rebuilding the base, excavate to a depth that gives you 4 to 6 inches for base course, plus 1 inch for bedding sand, plus the paver thickness — typically 8 to 10 inches total below your finished string line.
- Lay geotextile fabric if needed. If your soil is sandy, clay-heavy, or you've had repeated settling issues, lay a geotextile fabric on the subgrade before adding base material. It keeps the layers from mixing without blocking drainage.
- Add and compact the base. Fill with compactable crushed gravel in 2- to 3-inch lifts, compacting each layer with the plate compactor before adding the next. Don't try to compact 6 inches all at once — it won't compact evenly. After compaction, check the base surface with your string lines to make sure you're holding your drainage grade.
- Set screed rails and screed the bedding sand. Lay 1-inch diameter pipes or rails on the compacted base, spaced so your screed board spans between them. Pour bedding sand between the rails and drag the screed board across to create a consistent 1-inch-deep, flat bed. Remove the rails carefully and fill the channels left behind, then lightly smooth without re-compacting the sand.
- Reset pavers. Set pavers onto the screeded sand starting from a straight edge or the house end. Don't kneel on the fresh sand — use a kneeling board to distribute your weight. Tap each paver firm with a rubber mallet. Keep a level or long straightedge handy to check for lips between units as you go.
- Compact and finish. Once an area is set, run the plate compactor over the pavers (use a rubber pad attachment to avoid scratching them) to seat them fully into the sand. Sweep polymeric sand into the joints, mist with water per the product instructions, and allow it to cure. Check the surface one more time with your level and string lines.
Keeping it level: drainage, settling, and long-term durability
The work you do today is only as good as what happens to the patio over the next few freeze-thaw cycles, heavy rains, and years of foot traffic. A few habits will make the difference between a patio that stays put and one you're fixing again in three years.
- Protect the edges. Paver edges are the most vulnerable to shifting because there's nothing holding the outside course in place. Install plastic or aluminum paver edging pinned with 10-inch spikes into the base, and keep soil and mulch from piling up against the edges — organic material retains moisture and accelerates base softening.
- Maintain joint sand. Polymeric sand locks pavers together, but it weathers and washes out over time. Every year or two, check the joints and top them off. Loose joints let pavers rock and migrate.
- Keep drainage paths clear. Make sure the perimeter of the patio drains freely to a lawn, garden bed, or drainage channel. If water backs up at the edge and has nowhere to go, it'll find its way under the base.
- Watch for the first signs of settling. A paver that rocks or a slight dip that forms after a wet winter is much easier to fix early — just pull a few stones, add a bit of sand, and reset — than after the whole area has shifted.
- Avoid heavy concentrated loads on the sand-set area. A patio is built for people and furniture, not for vehicle weight or heavy planters sat in one spot for years. Both will accelerate localized settling.
Common mistakes and how to fix them fast
These are the errors I see most often on DIY patio projects, along with what to do when you realize you've made one.
Trying to fix grade with extra bedding sand
This is the number one shortcut that causes long-term problems. If you pile extra sand under a low spot to bring a paver up to level, that sand will compress unevenly under load and the paver will sink again. The fix for a grade problem is in the base layer, not the bedding. Pull the paver, add base material, compact it, then re-screed a proper 1-inch sand layer.
Skipping compaction on the base
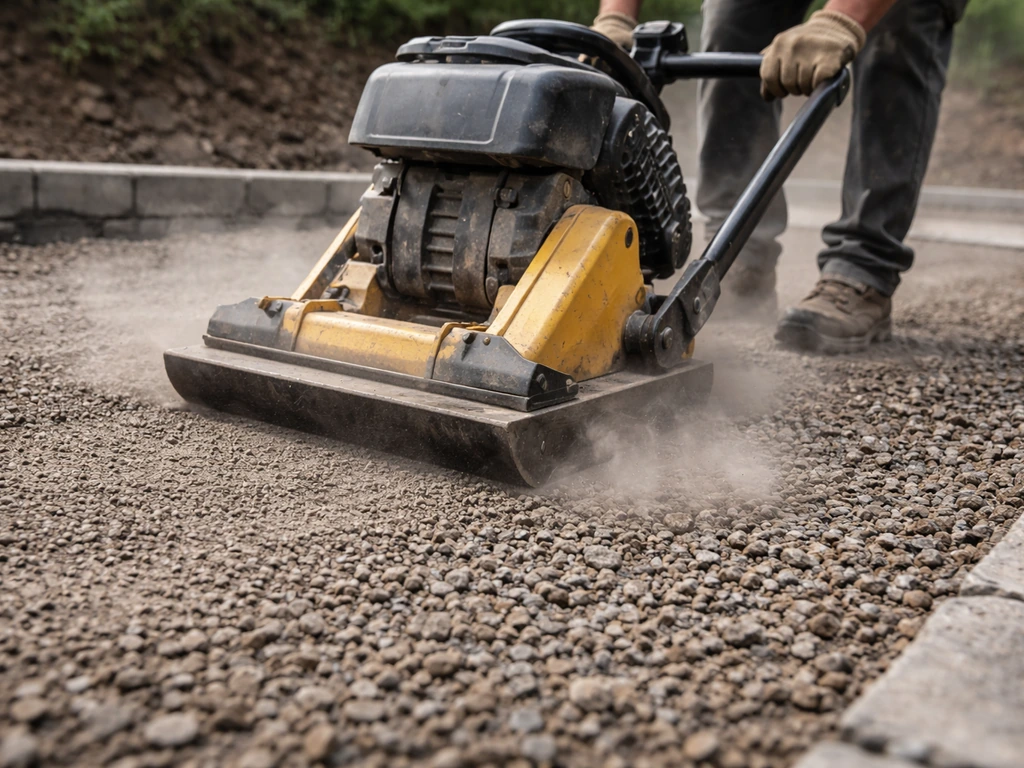
Loose gravel base might look fine when you set pavers on it, but it will settle under weight and freeze-thaw pressure. If you've already built on an uncompacted base and you're seeing widespread settling, the real fix is to pull up the affected section and do it right. Renting a plate compactor for a day is always worth it.
Rocking or wobbly pavers
A rocking paver usually means a high spot in the bedding sand or a small piece of gravel stuck under one corner. Pop the paver with a flat bar, remove whatever is causing the high spot, and reset. This is a 5-minute fix if you catch it before re-compacting and filling joints.
Lips between pavers after settling
When one paver sinks relative to its neighbor, it creates a trip-hazard lip. For a small area (a few pavers), pull the sunken ones, add a thin layer of sand, compact lightly, and reset. If you have lips across a large area, it usually points to an uneven base, work your way across the section methodically rather than chasing individual pavers.
Drainage grade running toward the house
If you discover your entire patio drains inward or toward the foundation, that's not a sand-layer fix. If you’re trying to learn how to make a level patio, this is the moment to step back and re-establish grade from the base up rather than relying on sand adjustments. You need to re-establish grade from the base up across the whole area, or at minimum across whatever section is causing the problem. This is related to the broader challenge of building on uneven ground or correcting initial grade errors, and it's worth tackling completely rather than applying a partial fix that leaves water management unresolved.
Ignoring the soil beneath the base
Clay soils expand when wet and contract when dry, and both movements heave your patio. Sandy soils drain well but migrate under load. If you've had repeated settling despite a proper-looking install, the subgrade is probably the culprit. Adding a geotextile fabric layer and increasing your base depth are the long-term answers. In extreme cases, especially on steep slopes or very soft ground, the approach to leveling overlaps with building up the ground underneath, a deeper project but a permanent one.
FAQ
Should my patio be perfectly level from the house to the far edge?
Not exactly. A patio should be flat to walk on, but it should not be perfectly level from end to end. Use the same “drop per foot away from the house” slope you measured, then only fine-tune local flatness with sand or paver resetting so you do not undo the drainage grade.
What if the patio looks level but still has puddles?
If the top of pavers look level but water still pools, your drainage grade is wrong or the subgrade is uneven. Re-check the slope with a string line and measure multiple points across the width, then confirm where water runs after rain or after a hose test.
How many points should I measure to confirm patio level?
Don’t rely on a single measurement at one point. Measure the drop along the entire run and across the width (use a grid with the 4-foot level or the string method), because localized dips can be missed and will become trip hazards later.
My paver rocks. Is that usually a drainage issue or a flatness issue?
A rocking paver can come from high bedding or grit under one corner, not only from overall slope. Pop the paver, remove the debris or high spot, reset it, then re-check the surrounding section to make sure the bedding thickness stays consistent.
Can I fix a low spot by adding more sand under the pavers?
If you raise the patio by overfilling the bedding sand, it will often compress unevenly and sink again. The grade problem usually needs correction in the base layer, then you reset using a thin, consistent bedding layer for final flatness.
Why does my patio keep settling back after I level it?
Yes, and it is often a sign the base is failing or the subgrade is moving, especially if it happens across a section rather than one isolated paver. Treat it as a base up problem, not a “one paver at a time” fix.
How do I decide whether to fix a few pavers or redo a whole section?
For sand-set pavers, isolated lips or dips are usually quicker to repair by lifting the affected pavers, adding base material and compacting, then resetting with the correct bedding thickness. If the lip runs across many stones, expect you may need to rework the base across that area.
What should I do if my patio slopes toward the house?
If water is running toward the house or collecting at the house edge, stop trying to shim and instead re-establish the drainage grade from the base up. Even a well-leveled walking surface can be wrong if the slope direction is reversed.
How do I set the correct patio height relative to my door threshold?
Measure elevation at the threshold or door sill so the patio height transition works for how the door opens and how water should shed. If the patio is too high at the house edge, water can be forced toward the foundation even if the pavers look flat on top.
How can I test drainage without waiting for heavy rain?
A hose test helps, but use it consistently. Run water from the same height and location for each test, then watch the flow path for 10 to 15 minutes, not just the first few minutes, because some pooling shows up later as water soaks in.
Why does water collect along my patio border?
Yes. Even with the right slope, edges that are higher than the lawn or beds can create a boundary dam that traps water along the border. Re-check where the patio meets soil, mulch, or landscaping and make sure runoff can travel away from the house.
Does the best leveling fix change depending on whether I have pavers or a concrete slab?
Expect differences: concrete slabs can need surface grinding or resurfacing for minor highs and sound lows, while significant sinking usually requires lifting methods. Pavers on sand usually fail at the base and are repaired by lifting and rebuilding that section.
Will a small slope mistake become a big problem over time?
Yes. Freeze-thaw and foot traffic amplify small errors. If the slope is on the low end or joints are compromised, water can infiltrate and worsen base movement over repeated seasons, leading to renewed settlement.
How should I mark problems during assessment so I know what to fix?
Marking helps, but also plan the repair depth. Note whether each low spot is isolated or widespread, then decide whether you only need local reset, base add and compaction, or full section reconstruction before you start pulling pavers.
Next Article
How to Even Ground for Patio: DIY Leveling Steps
Learn how to even ground for a patio: measure, fix low spots, build base, set slope for drainage, and compact right.