Getting the ground level for a patio means two things at once: a flat, compacted base your surface material can sit on without rocking or settling, and a slight slope built in so water drains away from your house instead of pooling under your patio. You need both. The target is a base that reads within ±3/8 inch over a 10-foot straightedge, pitched about 1/4 inch per foot away from the house. Nail those two numbers and every patio material from pavers to poured concrete will perform the way it's supposed to. This same process for slope, compacted base, and elevation checks is how you even ground for a patio.
How to Make Ground Level for a Patio: DIY Steps

Nolan Lennox
1 Jul 2026
Level isn't the same as flat: what you're actually aiming for
A lot of first-time builders make the mistake of thinking 'level' means perfectly horizontal. For a patio, it doesn't. A truly level patio would hold water like a bathtub. What you want is a consistent, controlled slope away from the house, flat enough to feel comfortable underfoot, pitched enough to shed rain quickly. The standard target for pavers and concrete alike is 1/4 inch of drop per foot of horizontal distance. At that rate, a 12-foot-deep patio drops 3 inches from the house wall to the outer edge. That's barely noticeable when you're sitting out there, but it's enough to keep water moving.
For concrete specifically, the minimum acceptable slope is 1/8 inch per foot (about 1%), but 1/4 inch per foot (2%) is the better target and what most slab calculators recommend. For pavers, a 1% cross-slope, roughly 1 inch per 8 feet, is a solid drainage design built right into the base. Never slope toward the house, and don't assume your existing yard grade runs in the right direction. Yards slope in all kinds of ways, and you can't rely on them to handle your patio drainage.
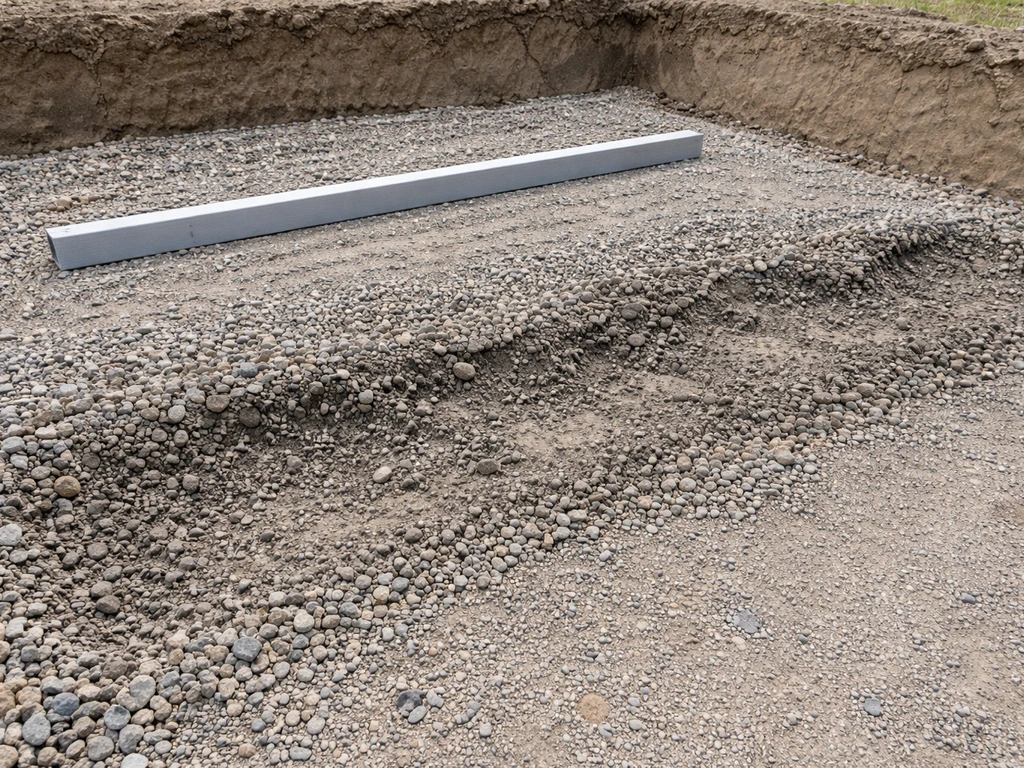
Measure and mark your elevations before you touch a shovel
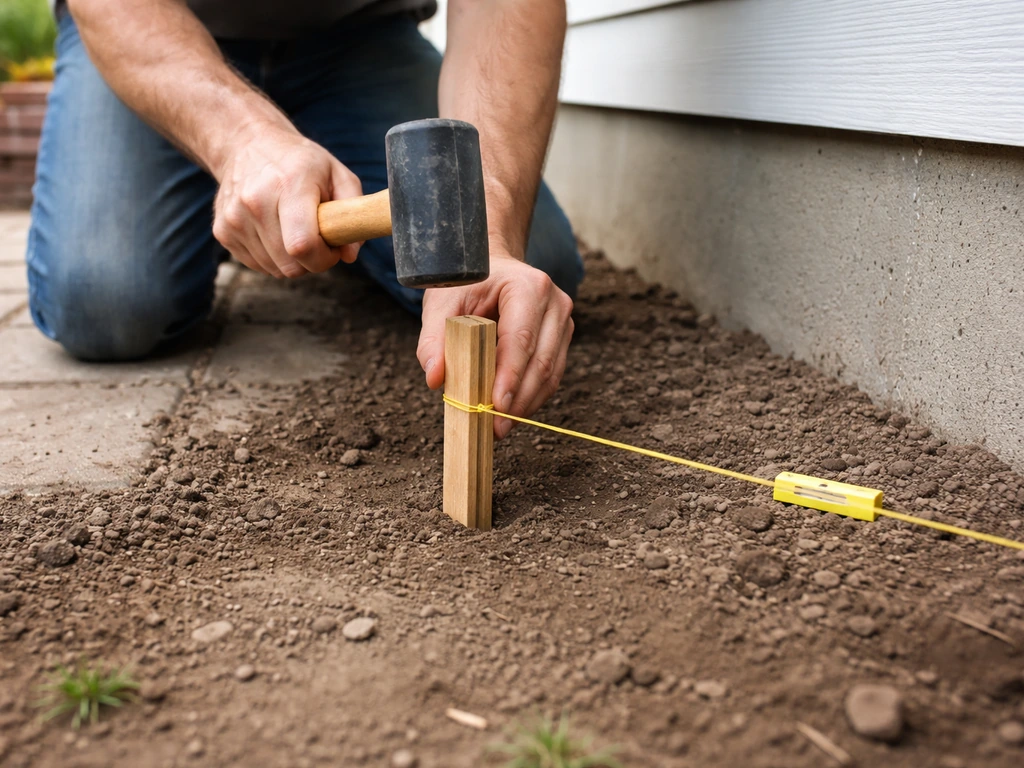
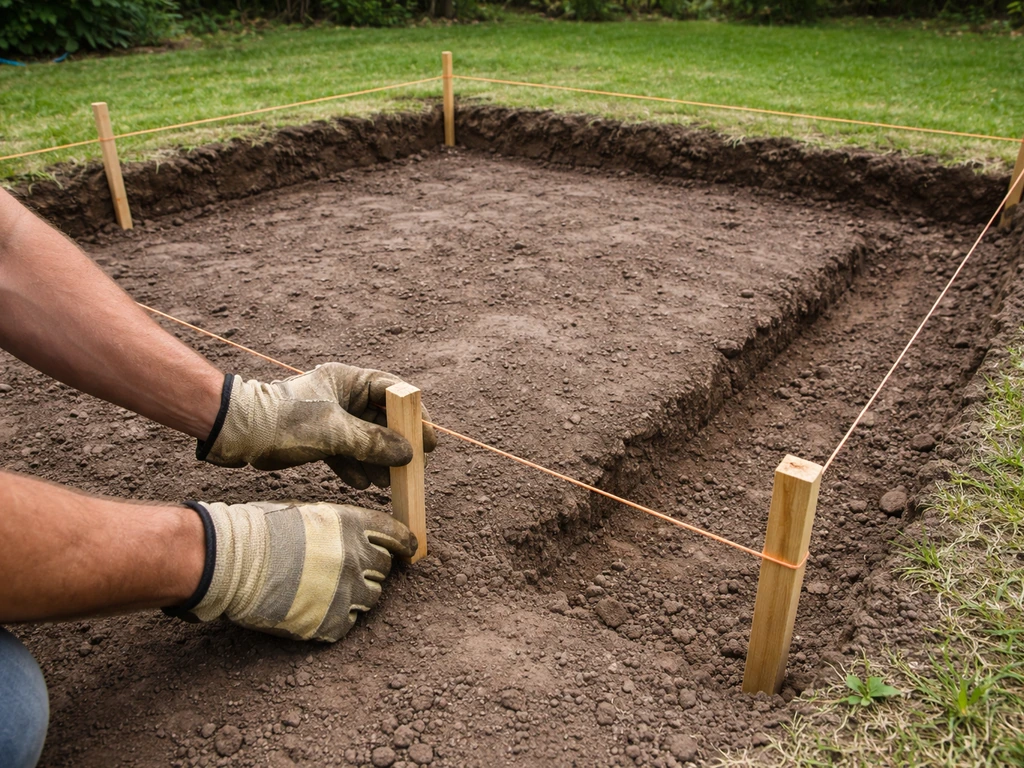
The most common DIY mistake is skipping this step and trying to eyeball it later. Setting up elevation references before you dig takes maybe 30 minutes and saves you hours of corrective work. Here's the basic approach using string lines and stakes, which costs almost nothing and works for most residential patios. Raising the patio level starts with measuring the existing elevation and then building the base up in the right thickness so the finished surface matches your target height and slope raise patio level.
- Drive a wooden stake at the house wall (or just outside your door threshold) at one corner of the patio area. This is your reference high point.
- Drive stakes at all other corners of your planned patio footprint.
- Tie a string from the house stake out to each outer stake. Use a line level (a small bubble level that clips onto the string) to get the string perfectly level at the reference height.
- Once the string is level, lower the outer end by the amount of slope you want. For a 10-foot run at 1/4 inch per foot, that's 2.5 inches. Measure down from the level position and re-tie the string there.
- Keep strings taut — any sag distorts your grade reading. If spans are long, add an intermediate stake in the middle to support the string.
- Measure from the string down to the ground at multiple points across the patio area to identify high spots, low spots, and how much material needs to come out or go in.
If you want more precision, a laser level on a tripod is worth renting for a day (usually around $40–60). You set it at a reference height, then use a measuring rod or tape to verify elevation at any point across the site. A water level, basically a long clear hose filled with water, is a surprisingly accurate low-cost alternative for transferring elevations around corners or across longer distances where a string would sag. The physics are simple: water in a connected hose always finds its own level, so you can read the same elevation on both ends no matter where you hold them.
Excavate and fix the subgrade: the work that actually matters most
Your base is only as good as what's underneath it. Topsoil is the enemy here, it's full of organic matter that compresses and decomposes over time, which is exactly why patios sink and crack. Remove all of it. Dig down until you hit the firm mineral soil underneath. After you’ve excavated to firm mineral soil, you build up the patio ground in layers and compact each lift so the base stays stable and drains well. For most yards, that means removing at least 6–8 inches of material, sometimes more if you have a thick lawn.
How deep you excavate in total depends on what you're building. A good rule of thumb: total excavation depth equals the thickness of your patio surface material plus 1 inch of bedding sand (for pavers) plus your compacted base depth. For pedestrian patios, plan on 4–6 inches of compacted base. For anything that might see light vehicle traffic, that goes up to 6–8 inches. Add those numbers together and that's how deep you're digging from your finished patio surface elevation.
Once you're at subgrade depth, probe the exposed soil. Step on it firmly, press with a stake, if it feels soft or spongy in spots, those areas need attention before you build anything on top. Soft spots are usually caused by buried organic material, high clay content, or poor drainage.
Options: dig out the bad material and replace it with compacted gravel, or in severe cases, consider a geotextile fabric placed directly on the subgrade before your base material goes down. On clay or silty soils especially, a geotextile fabric is worth the $0. 10–0. 20 per square foot it costs, it prevents fine soil particles from migrating up into your gravel base over time, which is one of the sneakier causes of long-term patio settling.
Build the base in layers and compact it properly
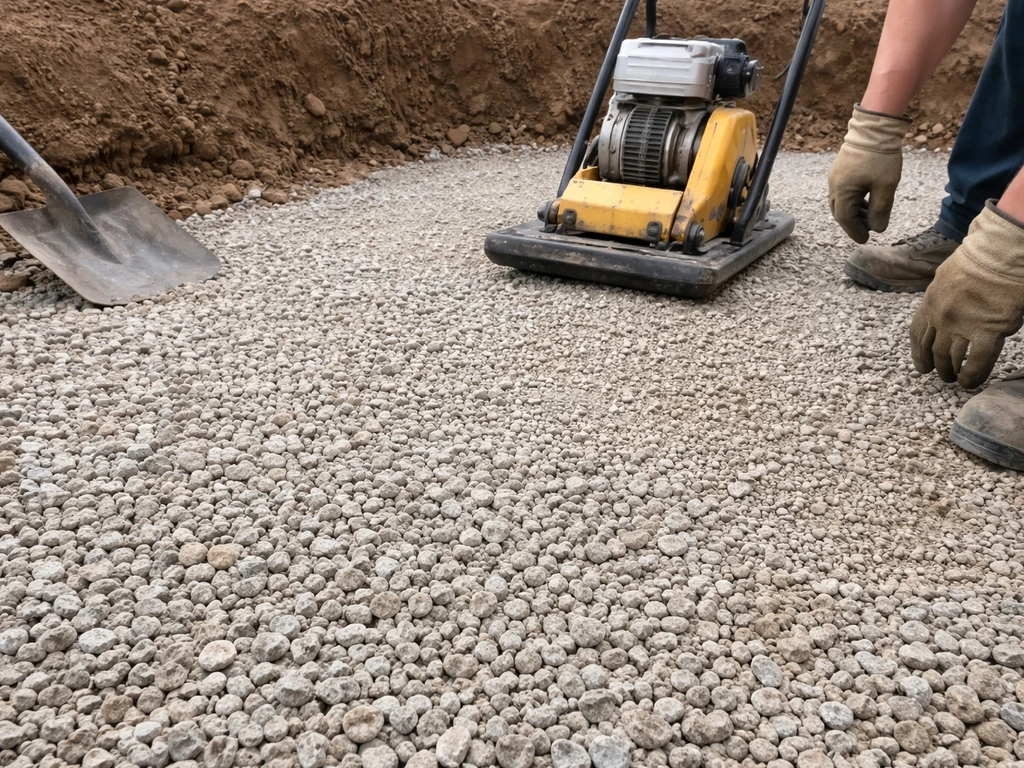
The base is where the real structural work happens. A well-built layered base absorbs load, drains water, and resists frost heave. Skimping here is the single biggest reason DIY patios fail within a few years.
Use crushed stone or a Class 5 gravel (a blend of 3/4-inch rock, sand, and fines) as your base material. Avoid rounded river rock or pea gravel, they don't lock together and won't compact firmly. Crushed stone with angular faces binds when compacted, which is exactly what you want. Add it in lifts no deeper than 4 inches at a time. Compact each lift with a plate compactor before adding the next one. Running the compactor in one direction and then making a second pass at 90 degrees gives you much more consistent density than a single-direction pass.
Keep the base material slightly moist during compaction, not muddy, just damp. Dry crushed stone doesn't compact as tightly. You'll know a lift is done when the plate compactor stops sinking into the surface and the material feels rock-solid underfoot. After all lifts are compacted, re-check your elevations and slope against your string lines. Fill any low spots with additional base material, compact again, and repeat until the surface is within ±3/8 inch over a 10-foot straightedge across the entire area.
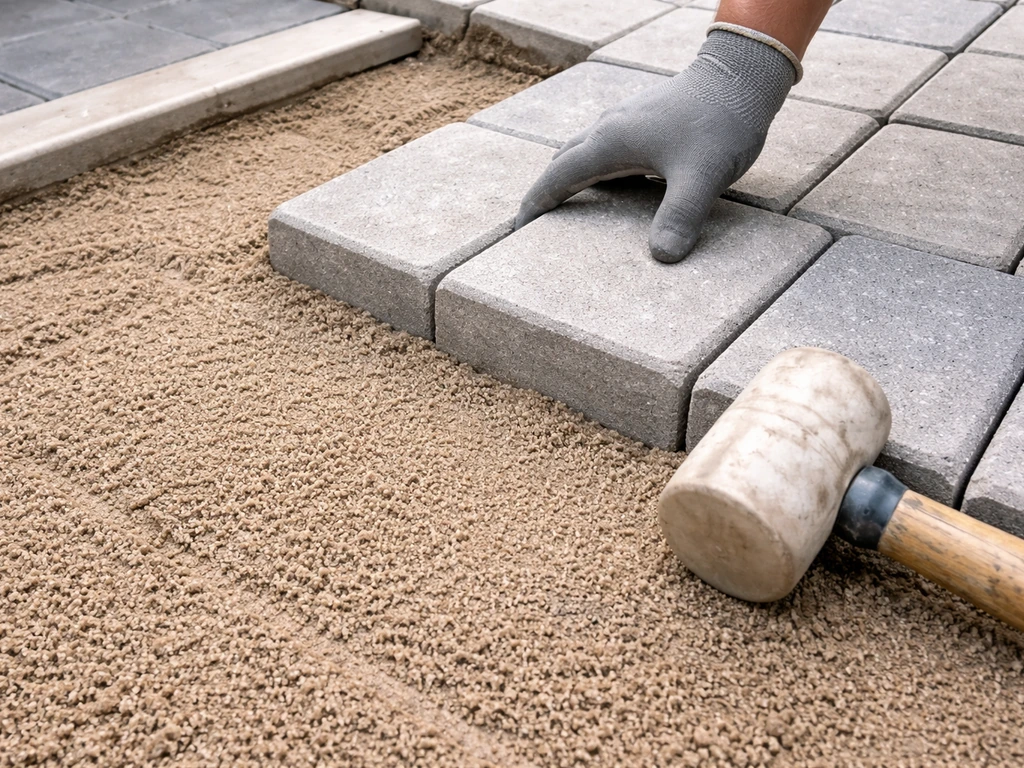
Screeding the bedding layer (for pavers)
For paver and brick installations, once the compacted gravel base is done, you add a 1-inch layer of coarse bedding sand on top. Set two metal pipes or conduit as screed rails at your target finished height, matching the slope you've built into the base. Drag a straightedge (a straight 2x4 works fine) across the rails to create a smooth, even sand surface. Don't walk on the screeded sand after this point, just set your pavers directly and work from the surface you're laying.
How the approach changes by patio type
The fundamental goal, flat, sloped, compacted, is the same for every patio. But the specific depths, materials, and tolerances shift depending on what surface you're installing.
| Patio Type | Base Depth (compacted) | Bedding Layer | Surface Tolerance | Drainage Slope |
|---|---|---|---|---|
| Pavers / Brick | 4–6 in crushed stone | 1 in coarse sand | ±3/8 in over 10 ft | 1/4 in per ft (min 1/8 in per ft) |
| Poured Concrete | 4–6 in compacted gravel | None (pour direct) | Screeded flat during pour | 1/8–1/4 in per ft (1–2%) |
| Gravel / Loose Stone | 2–4 in compacted gravel base | None | Raked flat | 1/4 in per ft away from house |
| Raised / Deck-style | Posts/footings on level pads | N/A | Frame leveled by framing | Built into frame pitch or post heights |
Pavers and brick
This is the most base-prep-intensive option because the individual units are small and any unevenness telegraphs through instantly. That same sensitivity means you have to plan the base and slope carefully when you are working on uneven ground unevenness telegraphs through instantly. You need the full compacted gravel base, the screeded sand layer, and you need to hit that ±3/8-inch tolerance across the whole area before a single paver goes down. The payoff is that pavers are adjustable, if a spot settles later, you can pull them up and re-level without demolishing anything.
Poured concrete
Concrete is less forgiving after the pour but slightly more forgiving of minor base imperfections because the slab spans across the base as a rigid unit. That said, voids, soft spots, and poor compaction will eventually cause cracking. Aim for at least 4 inches of compacted gravel base and get the subgrade proofrolled or hand-tamped solid. Build your slope into the forms, the concrete follows whatever the forms tell it to do, so set those forms at the right elevation before you order the truck.
Gravel and loose stone
This is the most forgiving surface to level because you're raking a loose material. But the subgrade and base still matter, without a compacted layer underneath, your gravel patio will develop ruts and low spots after the first rainy season. Use landscape fabric on the subgrade to control weeds, add 2–4 inches of compacted base gravel, then finish with your decorative stone on top. You can re-rake and top-dress this type easily over the years.
Raised and deck-style patios
If you're building a raised patio on significantly uneven terrain, the ground leveling work shifts to setting footings and posts at consistent heights rather than grading the entire area. You still need properly compacted concrete pads or tube footings at each post location, set below the frost line. The 'level' work happens in the framing, you use a laser or string line to establish a consistent height for all your beam hangers, then cut posts to match.
This approach is worth considering on steep slopes where excavating to a level plane would mean moving massive amounts of dirt. If you want the overall process for setting the right pitch, base depth, and finishing grade, see our guide on how to raise a patio area.
Quality checks before you install anything
Before you lay a single paver or call for a concrete pour, run through these checks. Rushing past them is exactly how you end up tearing things apart six months later.
- Flatness: Lay a 10-foot straightedge across the compacted base in multiple directions. No gap between the straightedge and the base should exceed 3/8 inch. If it does, fill and recompact.
- Slope: Re-check your string lines and measure the actual drop from house to outer edge. Confirm you have at least 1/8 inch per foot of fall, and that the slope runs away from the house in all directions water could travel.
- Compaction: Step firmly across every part of the base. It should feel solid everywhere — no soft spots, no give. If a section feels different from the rest, compact it again.
- Depth: Before backfilling or adding bedding, double-check that your base top is at the right elevation — meaning your finished surface will come out level with doors, thresholds, and adjacent surfaces as planned.
- Drainage direction: Pour a bucket of water on the base in a few spots. It should run away from the house, not sit or run sideways toward walls or adjacent structures.
Common mistakes and how to troubleshoot problems after the fact
I've seen (and made) every one of these mistakes. Some are easy fixes, some are tear-it-out-and-start-over situations.
Not accounting for total thickness when setting excavation depth
This is the most common math error. You need to work backward from your finished surface elevation: subtract paver thickness, subtract the 1-inch sand layer, subtract your base depth, and that tells you where your subgrade needs to be. If you dig to the wrong depth, your finished patio ends up too high (a tripping hazard at doors) or too low (water collects at the transition). Measure twice, dig once.
Poor compaction between lifts
Dumping 8 inches of gravel in one shot and running a plate compactor over it once does almost nothing. You cannot compact material adequately in lifts deeper than 4 inches. If you skipped this and your patio is already built, the signs are uneven settling, pavers rocking or tilting, and joints widening unevenly. The fix is unfortunately to pull up the surface, add base material in proper lifts with compaction between each one, and relay.
Wrong slope direction or flat sections
Water pooling on a finished patio almost always traces back to flat sections in the base (or worse, areas that slope toward the house). If you have existing pooling, check whether the problem is in the base grade or just the surface. If you’re wondering how to lift a patio that’s settled, the first step is diagnosing whether the problem is in the base grade or in the surface layers. For pavers, you can sometimes fix this by pulling up the affected pavers, adjusting the sand bed, and resetting. For concrete, it's a much harder fix, surface grinding, topping compounds, or in bad cases, cutting and pouring a new section.
Skipping subgrade stabilization on clay or soft soils
Clay soils expand and contract with moisture changes. Without either a geotextile or adequate base depth to buffer that movement, you'll see differential settling, meaning one section of the patio drops more than another. Frost heave in cold climates makes this worse: trapped water in clay freezes, expands, and pushes surface material up. Prevention is much easier than repair. If you're still in the planning stage on clay soil, add an inch or two of base depth and put down a geotextile on the subgrade.
Relying on eyeballing instead of measuring
Human eyes are terrible at detecting a 1/4-inch-per-foot slope. You cannot see a 2% grade. You also can't see a 3/8-inch deviation across 10 feet. These tolerances only exist in tools, strings, levels, and straightedges. If you're tempted to skip the measuring step because the base 'looks right,' don't. Set up the string lines, check with the straightedge, and trust the numbers over your eyes every single time.
What to buy and rent to get started today
Here's what you actually need to pull this off. Most of it is inexpensive; the plate compactor is the one thing worth renting rather than buying for a single project.
- Wooden stakes and string: a few dollars at any home center
- Line level (clips to string): under $5
- Long straightedge or 10-foot 2x4: check for straightness before buying
- Tape measure: you probably have one
- Laser level: rent for $40–60/day, or borrow a builder's level if you know someone
- Plate compactor: rent for $60–100/day — do not skip this
- Crushed stone / Class 5 gravel: price varies by region, typically $30–50 per ton; estimate roughly 1 ton per 50–60 square feet at 4-inch depth
- Geotextile landscape fabric: $0.10–0.20 per square foot, highly recommended on clay or silty soils
- Coarse bedding sand (for pavers only): about 1 inch deep across your patio area
For a standard 12x16-foot paver patio (192 square feet), you're looking at roughly 3–4 tons of base gravel for a 4-inch compacted base, about a half-ton of bedding sand, and a day's rental of a plate compactor. Getting the ground truly ready takes a full weekend for most DIYers working alone, or a long Saturday with a helper. The investment in that prep work is what separates a patio that looks great in year ten from one that's already a mess by year two.
FAQ
Should I build the patio base level and then slope only the pavers or concrete on top?
No, the slope needs to be built into the compacted base (and screeded bedding for pavers). If the base is flat and only the surface shifts, water still sits in low areas below, and you will get rocking, joint issues (pavers), or cracking (concrete).
How do I set the slope if my patio will wrap around a corner or change direction?
Create separate targets for each run away from the house, then check cross-slope at a few perpendicular spots. Do not assume a single slope line works across bends, because water can channel differently around corners.
What if my patio area is not square or I have irregular edges near a walkway or steps?
Use a straightedge check and finish elevation checks at the edges and at any transition points (door thresholds, step landings). Keep the drainage direction consistent, but allow local grade adjustments at the perimeter so the patio does not end up too low where it meets steps or too high at doors.
Do I really need the ±3/8 inch tolerance, or is close enough fine?
For pavers, you do. Small base dips telegraph through immediately because the units sit on the sand bed and you can only correct so much with setting adjustments. For concrete, tolerances still matter, because poor base prep leads to voids and cracking, even if the slab spans the area.
Can I use my existing driveway or lawn grade to decide where to place my patio?
You should treat existing grade as untrustworthy for drainage. Walk the area after rain if possible, then measure elevations with a string, laser, or hose method, and build the pitch away from the house regardless of how the yard naturally slopes.
What do I do if I hit soft or muddy soil during excavation?
Stop and fix the subgrade before adding base. Remove the soft material down to firm mineral soil, replace with properly compacted gravel, and re-check with walking pressure or probing. If you have recurring softness, geotextile can help prevent fines migration, especially on clay or silty soils.
How do I choose between geotextile fabric and digging deeper or adding more base?
On clay or silty subgrades where fines pumping into the base is a concern, geotextile is often the easier prevention. If the subgrade is visibly organic or repeatedly soft, start by removing the problem material. Fabric is not a substitute for eliminating spongy soils.
What happens if I compact with a plate compactor but the gravel still looks uneven?
Uneven surface appearance is not the same as poor compaction. The real test is density and stability, check by whether the compactor keeps sinking and by verifying elevations with a straightedge after each lift. If lifts are not stable, you likely need thinner lift sizes, more passes, or slightly damp material.
How moist should the crushed stone be during compaction?
Aim for damp, not muddy. If water is pooling, it usually indicates too much moisture and can reduce compaction quality. If the material is completely dry and dusts heavily, it often compacts poorly, so mist it lightly and re-compact.
Where should I build the slope relative to the house siding or foundation?
Build the slope so the finished patio surface drains away from the house side, then match local elevations at doors, steps, and any adjacent surfaces. Do not bury drainage uphill behind patio edges, keep transitions controlled so water does not redirect back toward the foundation.
Can I correct pooling after the patio is finished without tearing everything out?
Sometimes for pavers, yes, by lifting the affected area, reworking the sand bed, and resetting. For concrete, fixes are more limited and often involve surface grinding or resurfacing, and severe base or grade issues typically require cutting and re-pouring a section.
What are signs my slope is wrong even before heavy rain?
Look for persistent puddle patterns after the first significant rain, but you can also spot flat base sections by checking elevations early. If you notice pavers rocking, widened joints at one edge, or localized dips during the install, those are grade problems that usually mean the base needs adjustment.
Is a laser level worth it for a small patio, or are string lines enough?
For many residential patios, string lines plus stakes and a straightedge are enough to hit the required tolerances. A laser is most helpful when the patio is larger, irregular, or you need repeated elevation checks across long runs without shifting reference points.
Next Article
How to Raise a Patio Area: Step-by-Step DIY Guide
Step-by-step DIY guide to raise a patio safely: grading, drainage, subbase, pavers and edging, plus troubleshooting and
