To make a level patio, you need to excavate to a consistent depth, compact a crushed-stone subbase in 2-3 inch lifts, and set screed rails that give your surface a gentle slope of 1/8 to 1/4 inch per foot away from the house. That slope is what keeps water off your patio and away from your foundation, and it's what most people mean when they say 'level.' A truly flat patio with zero slope actually puddles, so the goal is a controlled, consistent plane, not a spirit-level-perfect one.
How to Make a Level Patio: Step-by-Step DIY Guide

Nolan Lennox
14 Jun 2026
What 'level' actually means for a patio (and why drainage changes everything)
When contractors talk about a level patio, they're really talking about two things at once: a surface that doesn't rock, dip, or puddle, and a surface that sheds water in the right direction. Those two goals can feel like they're in conflict, but they're not.
For any patio within 10 feet of your house, the surface needs to slope away from the foundation at a minimum of 1/4 inch per foot. That's the Building America standard, and it's there to protect your foundation, not just your shoes. Some installers go as low as 1/8 inch per foot on well-drained sites, but 1/4 inch per foot is the safer default. Over a 10-foot-wide patio, that works out to a 2.5-inch total drop across the width, which is barely noticeable when you're sitting on it.
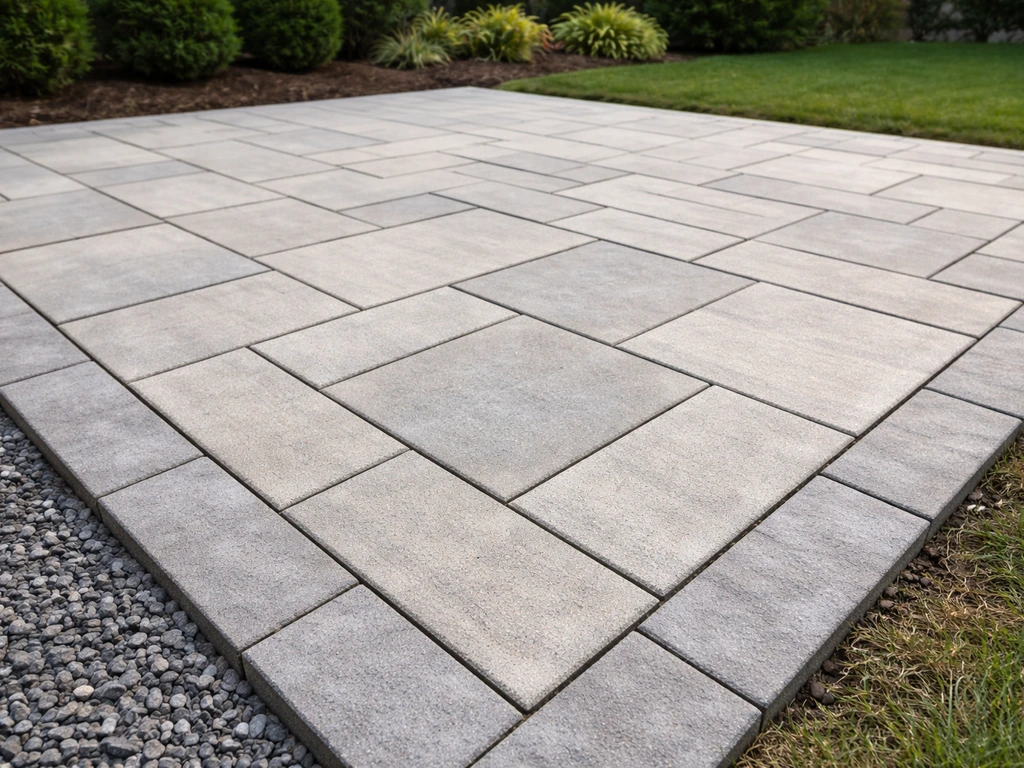
As for surface flatness, the industry standard for interlocking pavers is no more than 3/8 inch of variation over any 10-foot straightedge measurement. Some higher-end architectural paver specs tighten that to 3/16 inch over 10 feet. The other number worth knowing is lippage, which is the height difference between two adjacent pavers. For pedestrian patios, 1/8 inch is the acceptable maximum. Anything more and you've got a trip hazard, and anything less than dead-even is achievable with a good screed setup.
Tools and materials you'll actually need
Getting the plane right is almost entirely about having the right measuring and compaction tools before you start. Skimping here is where most DIY patios go wrong.
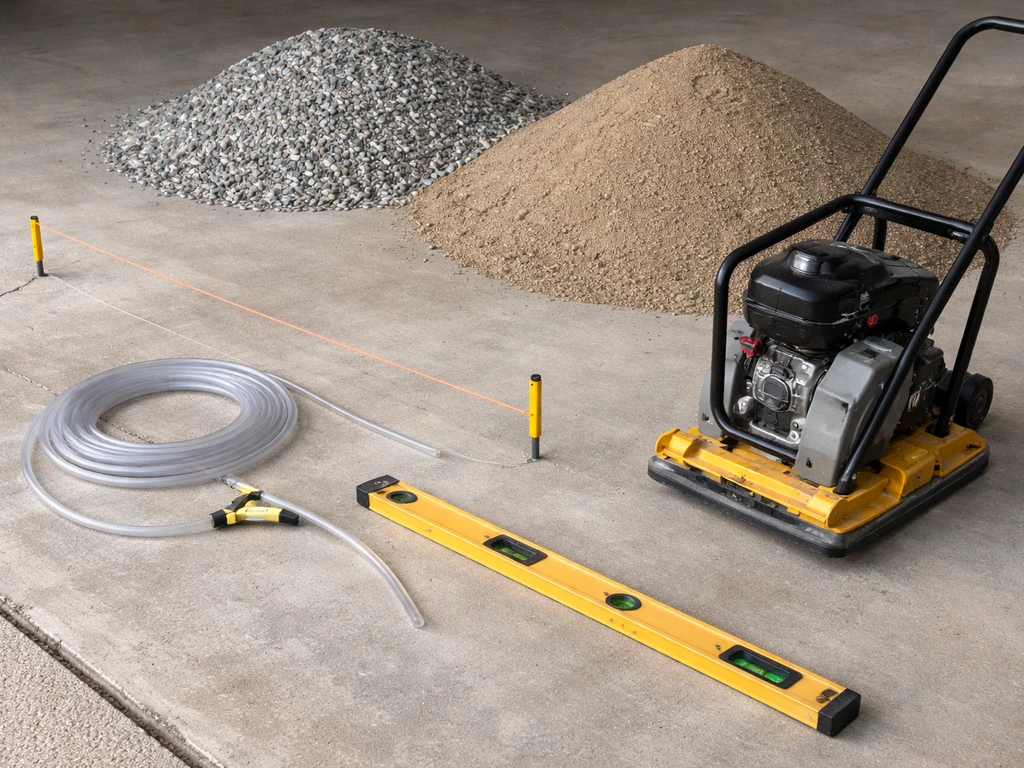
Leveling and layout tools
- Line level or water level (for running string lines across the site)
- Laser level (optional but genuinely makes the job faster and more accurate)
- 4-foot spirit level (for checking surface flatness during and after installation)
- 10-foot straightedge or aluminum screed rail (for flatness checks and screeding sand)
- Tape measure and marking paint or stakes
- String line and string line clips
Compaction and base materials
- Plate compactor (rentable for around $60-80/day — essential for any patio over 50 square feet)
- Hand tamper (fine for corners and tight edges only)
- Crushed stone or gravel (typically 3/4 inch crusher run or compactable base gravel)
- Coarse bedding sand (concrete sand, not play sand)
- Landscape fabric or geotextile (especially important if you have clay soil)
- Rubber mallet
- Shovel, rake, and wheelbarrow
A plate compactor is non-negotiable for anything bigger than a small accent pad. A hand tamper takes forever, tires you out, and doesn't deliver anywhere near the compaction density you need. Rent the plate compactor. It's worth every dollar.
Planning and layout: read your existing grade before you dig a thing
The most common mistake I see is people starting to dig without truly understanding what their yard is doing. Your existing grade might slope toward the house, away from it, or run sideways. This same idea is what you use when you plan how to make ground level for a patio, by adjusting excavation and base depth to match your drainage needs. You need to know this before you start, because it directly affects how much you excavate in each spot.
Setting up your string line grid

- Drive stakes at each corner of your intended patio footprint.
- Run string lines between the stakes at the height your finished surface should sit.
- Use a line level or laser level to get your strings reading true horizontal first.
- Then, on the strings running away from the house, drop the far end 1/4 inch for every foot of run. On a 12-foot-deep patio, the far string should be 3 inches lower than the house end.
- Use the 3-4-5 triangle method to confirm your corners are square: measure 3 feet along one string, 4 feet along the adjacent string, and adjust until the diagonal between those two points is exactly 5 feet.
- Once strings are set, measure down from the string to the ground at multiple points across the site. Record these measurements. They tell you exactly how uneven your existing ground is and where you need to cut or fill.
Those measurements from string to ground are your roadmap. Anywhere the distance is too short, you'll excavate more. Anywhere it's too long, you might need to build up. If the ground is higher than your planned patio depth, you may need to build up with additional base layers and compact them in lifts for a stable, level finish. The goal is a consistent depth from string to subbase across the whole patio, which is what gives you a consistent finished surface.
If your ground slopes significantly toward the house or has major grade changes across the site, you may want to look at how to build a patio on uneven ground or how to build up ground for a patio specifically, since those situations involve more soil management than a straightforward excavation.
Excavation and building your subbase: this is where level patios are made or lost
The subbase is doing 90 percent of the work. A correctly compacted base is what keeps your patio from settling, shifting, or developing low spots after the first winter. This step deserves more time and attention than the actual paver installation.
How deep to dig
For a standard pedestrian patio, you're looking at a total excavation depth that accommodates: 4 inches of compacted crushed stone base, 1 inch of bedding sand, and the thickness of your surface material (typically 2-3 inches for concrete pavers or brick, or 3.5-4 inches for a poured concrete slab). Add those up and mark that total depth on your stakes before you start digging. For most paver patios, you're excavating 7 to 9 inches below finished grade. If you need to raise the patio level, you’ll typically do it by increasing excavation depth or adding a thicker base and bedding system rather than trying to patch over an uneven subgrade how to raise patio level.
Preparing the subgrade
Once you've excavated to depth, compact the native soil itself before you add any base material. ICPI Tech Spec 2 reprinted guidance specifies compacting the subgrade (the native soil) to a minimum of 98% standard Proctor density (ASTM D698) before placing base material [ICPI Tech Spec 2 reprint PDF includes compaction requirement](https://www. poolinspections. com/manuals/decks/icpo-tech-specs-for-interlocking-pavers.
pdf). This is called subgrade compaction, and it's often skipped by beginners. Make at least two passes with the plate compactor over the excavated soil. If you have clay soil, lay a geotextile fabric directly on the compacted subgrade before adding your crushed stone.
The fabric acts as a separation layer that stops clay particles from migrating up into your aggregate base over time, which is exactly what causes mysterious soft spots and settling a few years down the road.
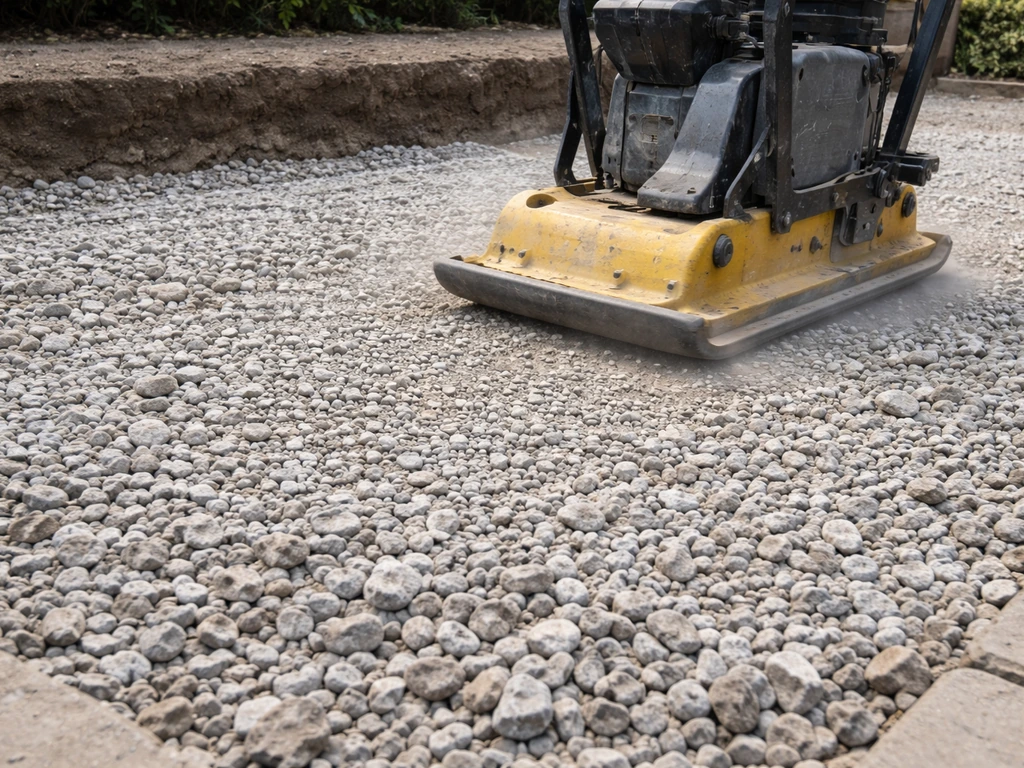
Building the crushed stone base in lifts
Don't dump all your crushed stone in at once and compact it. Add it in 2-3 inch layers (called lifts), compact each lift fully before adding the next. This is how you actually achieve the 98% compaction density that gives the base its stability. Dumping 6 inches and running the compactor over it once leaves the bottom portion under-compacted, and that's where settlement starts.
- Add a 2-3 inch lift of crushed stone and rake it roughly level.
- Make two to three overlapping passes with the plate compactor.
- Check the surface with a level or string line reference before adding the next lift.
- Repeat until you reach your target base depth (typically 4 inches compacted).
- On the final lift, use your string lines to check that the compacted base surface mirrors your intended patio slope consistently across the whole area.
For areas with drainage concerns or low spots that tend to collect water, running a perforated drain pipe (No. 57 stone wrapped in geotextile fabric) under the base before you build up can save a major headache later.
Setting edges and screeding for an even surface
Edge restraints go in after your base is compacted and before you screed your bedding sand. They're what stops your patio from creeping outward at the edges over time, which eventually causes gaps, lippage, and rocking. Plastic paver edging spiked into the compacted base works well for most DIY projects. Set it to your finished height reference and secure it every 12 inches.
Screeding the bedding sand
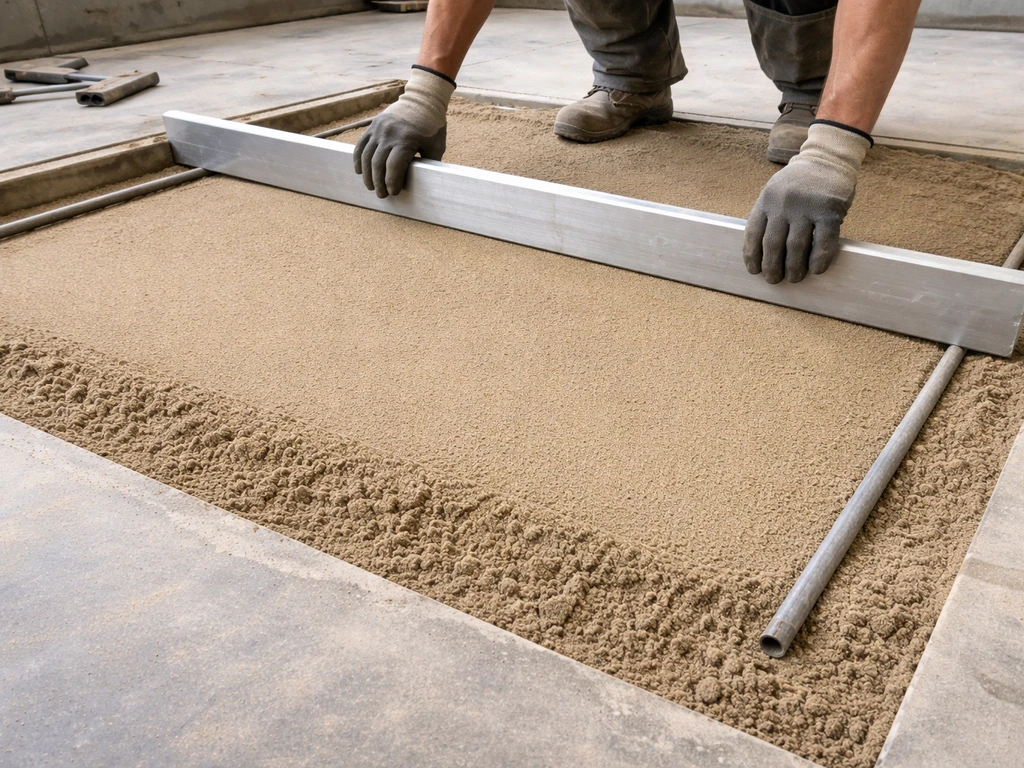
The bedding sand layer should be between 1/2 inch and 1 inch thick after screeding. No more than 1 inch. Thicker sand beds compress unevenly under foot traffic and lead to wobbly pavers. Use two pipes or metal conduit of the same diameter as your target sand depth (typically 1 inch diameter) as screed rails. Lay them parallel across the compacted base, fill the sand between them, and drag a straight board or aluminum screed rail across them to create a perfectly consistent 1-inch sand bed.
Work in manageable sections of 4-6 feet at a time and don't walk on the screeded sand. Once you've screeded a section, start laying your surface material immediately so you're not disturbing the sand bed. Carefully pull the screed pipes out as you go and fill those channels with sand, tamping lightly.
Installing your patio surface without losing the level you worked for
Whether you're laying pavers, brick, or flagstone, the principle is the same: set each unit on the screeded sand and tap it down with a rubber mallet until it's flush with its neighbors and consistent with your string line reference. Check lippage (the height difference between adjacent units) constantly. Your target is under 1/8 inch between any two adjacent pieces.
Pavers and brick
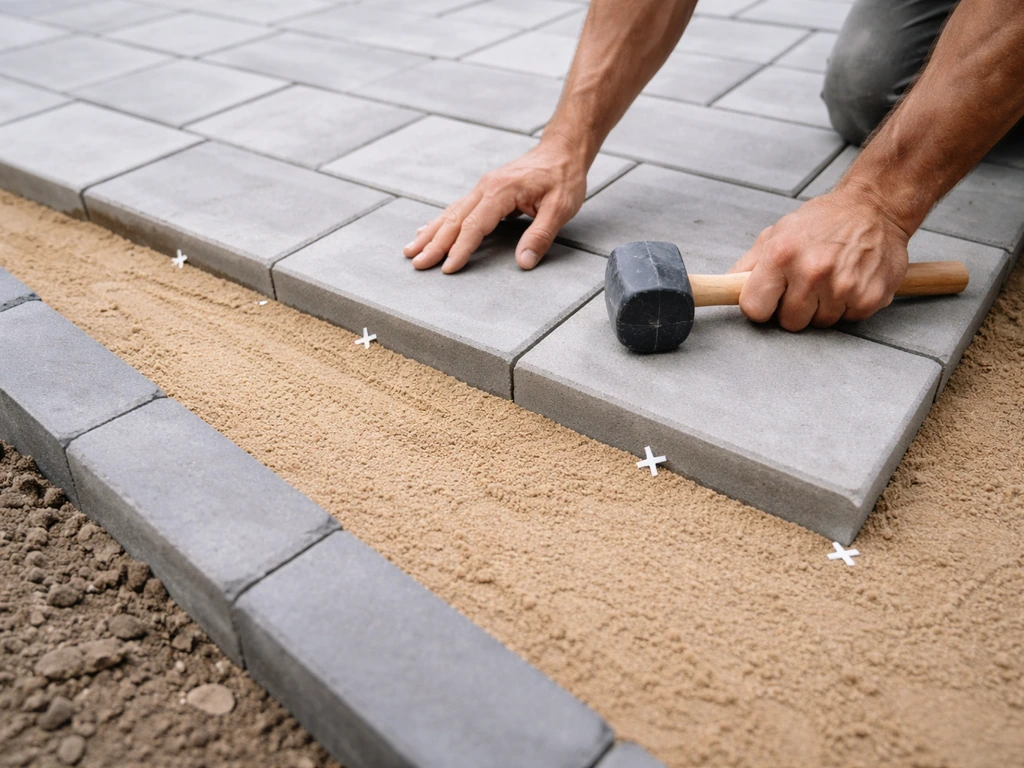
Start from a fixed, straight edge (usually the house or a chalk line) and work outward. Use spacers or consistent joint gaps. After you've laid the full surface, run the plate compactor over the pavers to seat them into the sand bed. Then sweep polymeric sand into the joints, compact again, and repeat the sweep-and-compact cycle until the joints are full. Only apply polymeric sand when the surface is completely dry, and check the weather forecast because it needs at least 24 hours without rain to cure properly.
Poured concrete slabs
For a poured concrete patio, your screed rails are form boards set to your exact finished height. Stake them firmly every 4-5 feet so they don't deflect under the weight of concrete. Double-check the slope reference one final time before pouring. Once the concrete is poured and screeded, avoid disturbing the surface during curing.
A quick material comparison for common patio surfaces
| Material | Leveling difficulty | Forgiveness for base imperfections | Repair ease | Typical DIY cost per sq ft |
|---|---|---|---|---|
| Concrete pavers | Moderate | Low (shows base errors) | High (individual units reset) | $8-$15 |
| Brick | Moderate | Low (similar to pavers) | High | $10-$18 |
| Poured concrete | High (forms must be exact) | Low (permanent once poured) | Low (cracked slabs are hard to fix) | $6-$12 |
| Flagstone/irregular stone | High (each piece varies) | Moderate (sand adjustments per stone) | Moderate | $15-$30 |
| Gravel/crushed stone | Low | High | Very high | $2-$5 |
For most first-time DIYers, concrete pavers are the most forgiving choice for a level patio. You can pull and reset individual units if something is off. Poured concrete rewards precision but punishes mistakes permanently.
Troubleshooting: catching problems before and after you finish
Before you finish
Before laying your final surface, do a full string-line check across the screeded base. Walk the perimeter and spot-check with a 4-foot level in multiple directions. If you find a low spot, add a bit of sand and re-screed. If you find a high spot in the base gravel, re-compact that area. Catching a 1/2-inch error now takes 10 minutes. Catching it after you've laid pavers takes hours.
Common mistakes and how to fix them
| Problem | Likely cause | Fix |
|---|---|---|
| Pavers rocking or clicking underfoot | Sand bed too thick or uneven | Pull affected pavers, re-screed sand to 1 inch, reset |
| Low puddle forming in the middle | Base compacted unevenly or insufficient slope | Lift pavers in affected area, add and compact base material, re-screed |
| Lippage between adjacent pavers | Uneven sand bed or thickness variation in pavers | Reset individual units, check sand depth |
| Patio slowly sinking along edges | Edge restraint failure or base material lost at edges | Add fresh base material, re-compact edge zone, install new edging |
| Polymeric sand washing out of joints | Rain before curing or inadequate compaction step | Let dry fully, re-apply polymeric sand with a dry surface forecast |
| Slope running wrong direction (toward house) | String lines set incorrectly at layout | Major correction: lift section, re-establish grade with string lines first |
Checks after curing and settling (30-90 days in)
Come back after the first heavy rain and look for standing water. Even small puddles tell you something about the slope. Walk the entire surface and press on individual pavers to check for any rocking. Sight down the surface from a low angle in good light to spot any high or low spots. For concrete slabs, inspect for hairline cracks along the edges where the slab meets the soil. Minor settling in the first season is normal, but significant movement (more than 3/8 inch over 10 feet) means you have a base compaction problem that will get worse.
Your pre-build checklist before you start digging
- String lines set with correct slope (1/4 inch per foot away from house) and confirmed square with 3-4-5 method
- Total excavation depth calculated and marked on stakes (base + sand + surface material thickness)
- Crushed stone and bedding sand quantities estimated and ordered
- Plate compactor rented or reserved
- Edge restraints purchased to full perimeter length
- Geotextile fabric on hand if clay soil is present
- Weather forecast checked: no rain for at least 48 hours during final sand and surface installation
- Utility lines marked (call 811 before digging)
If your site has a significant existing slope, particularly one running toward the house, you'll want to think through the grading work before you get to the patio build itself. If your main goal is to lift a patio to a higher finish level, the same groundwork and slope planning will guide where the extra height should come from.
How to even ground for a patio and how to make ground level for a patio cover those prep steps in more depth. For sites that need significant grade changes upward, how to raise a patio area or how to raise the patio level might be a better starting point.
If you need to raise the patio area, focus on proper excavating, building up the subbase in lifts, and re-checking the slope away from the house how to raise a patio level. If you need to raise your patio to match a target height, follow the steps for how to raise a patio level. The leveling process described here assumes you've already got your rough grade under control and you're ready to build the base and surface. For a step-by-step walkthrough, see our guide on how to get a patio level.
FAQ
Can I make a level patio with zero slope so it feels perfectly flat?
Yes, but you should still build in a drainage slope. A patio can be “flat to the eye” while still shedding water by targeting the required fall away from the house, then keeping the paver surface flat to the specified tolerances so it does not rock or puddle locally.
If water still pools after installation, is the problem usually the polymeric sand or the slope/base?
Polymeric sand works best for joint filling, but if you still see water standing after rain, the issue is almost always the finished plane or base shape, not the joints. Fix slope or correct a low area in the base before relying on joint products.
What should I do if I find a low or high spot after screeding the bedding sand?
Do not add sand to “save” a low spot once pavers are installed, it compresses over time and creates rocking. For a low area found before surface installation, add sand to the screeded base and re-screed, or if it is high in the base gravel, re-compact or remove material from that spot.
Is renting a plate compactor enough to prevent settlement?
Renting a plate compactor is ideal, but you also need correct technique. Compact each crushed-stone lift fully, overlap passes, and avoid using a compactor to fix under-excavated areas. If the base is too shallow or too soft, compaction alone cannot correct later settlement.
How do I know which direction my patio should drain before I start digging?
Check the grade direction before you excavate. Use string lines or a laser level to confirm whether your existing yard slopes toward the house, away from it, or sideways, then set your finished fall accordingly so the surface drains consistently.
When should I add a drain pipe under my patio?
For areas with poor drainage, consider adding a perforated drain under the base, with drainage stone around it and separation fabric where appropriate. A common mistake is adding surface slope without addressing groundwater, which can keep pushing water up into the base.
How do I keep from disturbing the screeded sand while I’m laying pavers?
Most DIYers benefit from working in smaller sections and keeping traffic off freshly screeded sand. If you must pass over an area, do it after the surface units are installed, because walking on sand can ruin the plane even if your slope looks correct.
Does the excavation depth change if I’m using brick, concrete pavers, or a poured concrete slab?
Yes, but match the material behavior to the base plan. Concrete pavers or brick typically need a thinner surface build than a poured slab, so you must adjust total excavation depth and re-check the slope reference to maintain the drainage fall.
When do edge restraints need to be installed, and why do timing and height matter?
Edge restraints usually should be installed after the base is compacted and set to your finished height reference, then secured frequently. If you delay edging or set it too low, you can get edge creep that later causes gaps and uneven joints.
What causes rocking pavers even if my patio is close to level on a long straightedge?
If you are within the acceptable flatness and lippage limits but still notice “rocking,” it usually means individual units are not seated evenly or sand migrated during installation. Lift and re-set the affected pavers, then re-check lippage in that localized area before moving on.
How can I tell the difference between minor concrete cracking and a base compaction problem?
For concrete, small cracking can occur, but significant movement is a red flag. A slab that shifts or settles more than the tolerance over 10 feet often indicates subgrade or base compaction problems, or inadequate thickness relative to the soil conditions.
Are there extra precautions for making a level patio in freeze-thaw climates?
In cold climates or freeze-thaw areas, drainage and separation layers are even more critical, and you should be strict about compacted lifts and fabric where clay is present. If you rush compaction or skip the separation layer, frost-related heaving can show up as rocking pavers or repeating low spots.
Next Article
How to Get a Patio Level Today: DIY Step by Step Guide
Step-by-step DIY plan to level a patio today: assess grade, fix low spots, rebase, reset pavers, and ensure proper drain
